Scrolling

Makeover: Creating My Dream Wardrobe From Start to Finish!


Paid partnership with Elfa, all words are my own and I only ever work with brands I love. 

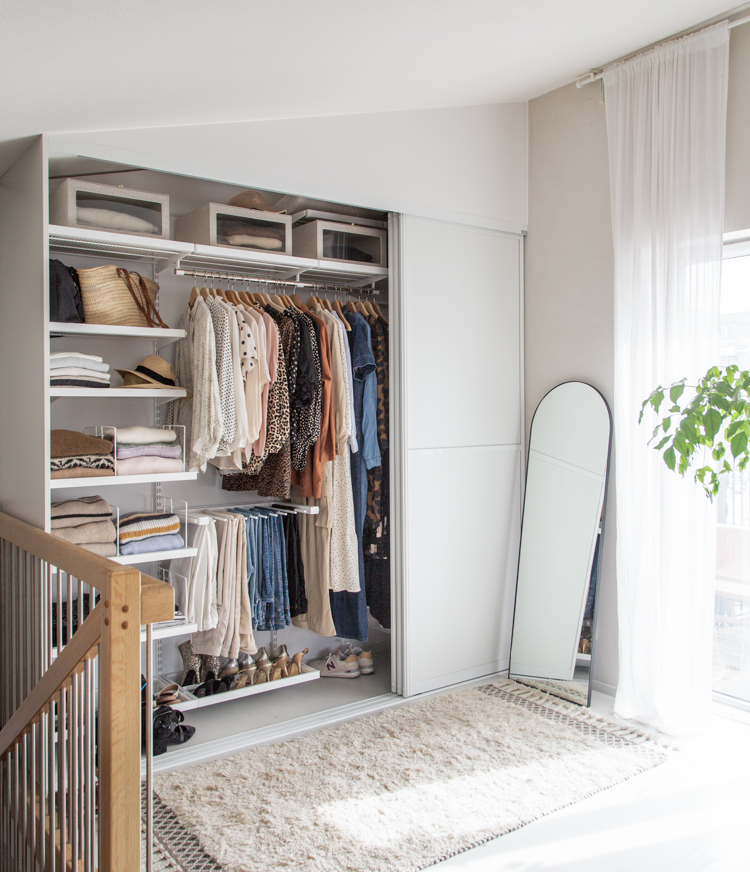
Remember I said this was going to the year I finally organise my home? I've moved one step closer - my new wardrobe is finished! 

Allow me to paint the scene. My previous wardrobe was sandwiched between the girls' bedrooms on the floor below, it was really small and cramped and I had to tip-toe through their rooms at night. I could never find anything; it simply wasn't practical in any shape or form and honestly, a total mess!

The far side of our bedroom on the top floor seemed like the obvious choice for a new one. In the past, this corner a reading corner, yoga studio and even once graced the cover of a book as my home office! But I've never really felt it's been put to great use - until now! 

The problem was, it's a slightly awkward spot: sandwiched between the stairs and a large radiator - plus it has a sloped ceiling. 

Here's how I transformed it with the help of international Swedish brand Elfa

The brief
I had an entire jumble of items that needed a home - from maxi dresses, jumpsuits, sweaters, jeans and gym kit, to hats, tights, jewellery and lingerie! Since we share a bathroom between five of us (two of which are teenagers) I was also keen to incorporate a little spot to do my hair and make-up. A girl can dream!

The obstacles


Radiator
This mighty radiator was in the way. To be honest, we hadn't used it all winter since I like to keep the area cool for my beloved lemon tree (AKA my fourth child!) while it winters indoors. Removing it was a no-brainer, so we called the plumber in. It left a gaping hole which we plugged and painted over.  

Bannisters
The bannisters to the left of the space were also an obstacle. In the end we decided to build a short floor-to-ceiling wall to frame the side of the wardrobe. 

Angled ceiling
Probably one of the most common problems when building a wardrobe is an awkward sloped ceiling. We hired a builder to insert a made-to-measure triangular shaped wood piece above the open-topped wardrobe. It was painted the same colour for a seamless look. The best thing about this is that we can use the full height of the room for storage. 

The design
The beauty of Elfa is that the system is fully flexible and can be adapted to fit your space and your needs. Plus, they offer a great online planning tool which enables you to easily design and plan your wardrobe to the exact measurements of your room - love that!  

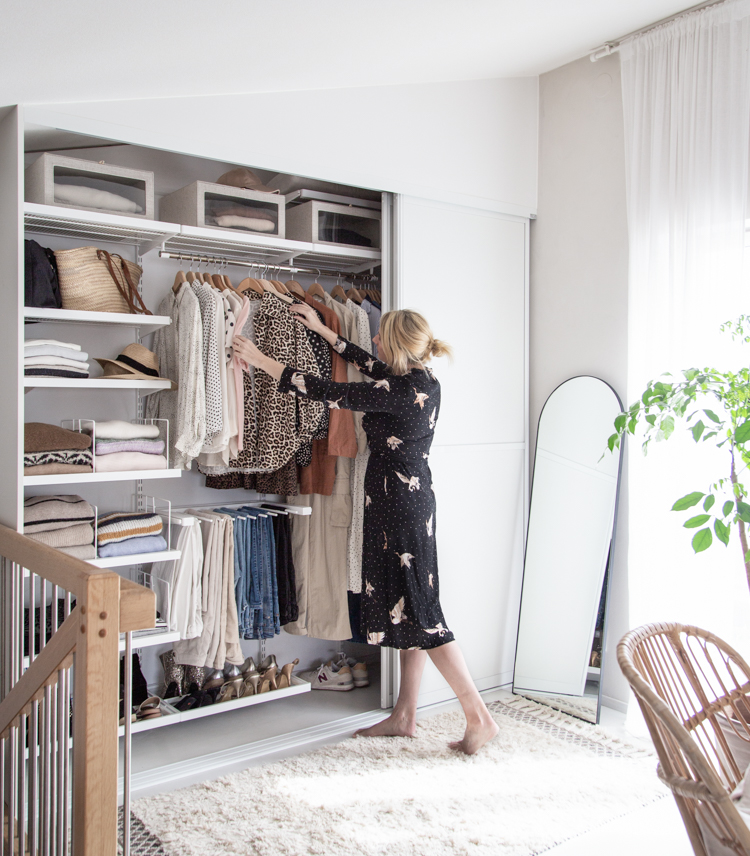
The system is centred around a series of vertical rods from which you 'click-in' your choice of shelves, sliding shoe racks, trouser rails, tie racks, rods, drawers, mirrors, hooks etc. 

Since it's in our bedroom, I wanted to go for a slightly smarter option, choosing a few items from the Décor assortment which combines function and flexibility with the style and luxury of wood. I combined open and closed solutions together with extra features such as a gliding shoe and trouser rack and somewhere to hang shorter and longer clothes. 

Door selection

I chose Forma doors in melamine satin white - a three door sliding solution. There are countless others to choose from (for those of you who live in Sweden, Norway, Denmark or Finland) - or you could go wild and opt for an open solution (I'm WAY too messy for that!).

The results

Once the vertical rods had been installed, everything else could just be clicked into place. Most of my wardrobe is made up of wire shelves with Décor fascia for a sleek, smart finish. 


I don't know how good you are at folding, but I think Marie Kondo would describe mine as distinctly sub-par! If you're the same, let me tell you, these click-in wire shelf dividers are a game changer. Not only do they condense the width of your folded sweaters making them appear more neat - they also allow you to double up on each shelf so you have room for more clothes. 


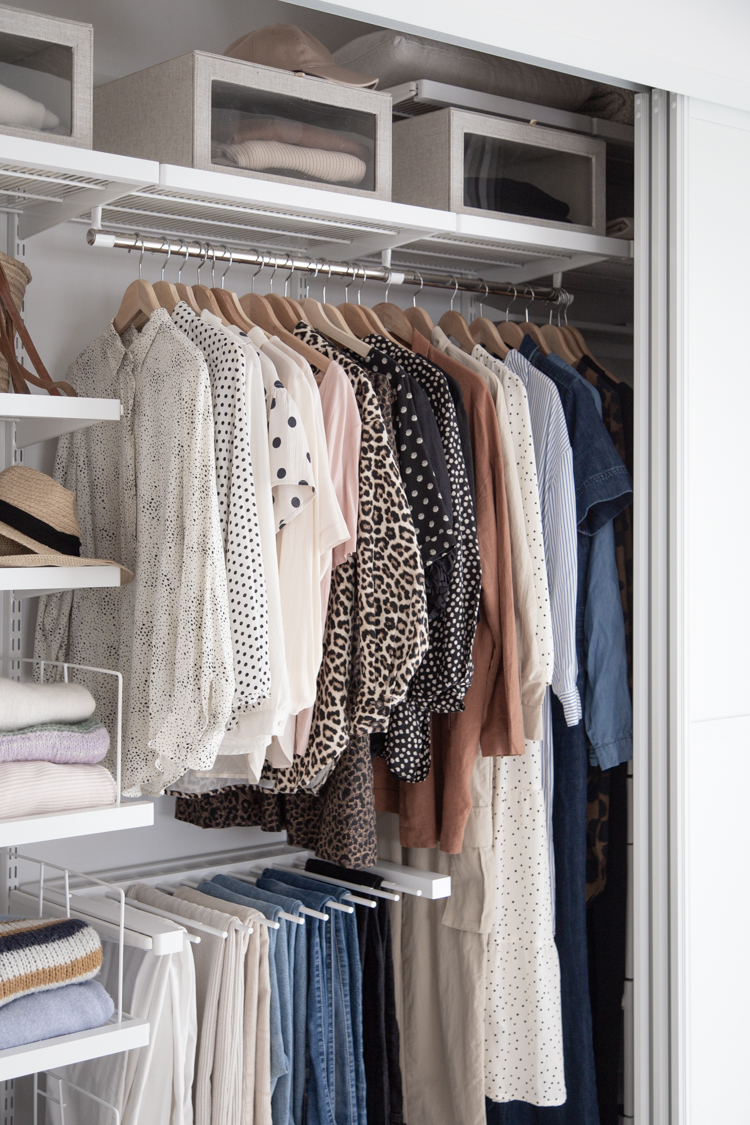
A long closet rod means I have place for longer and shorter clothes. And I placed some of my smarter sweaters in boxes from the Elfa studio - love that they can be dust free but still visible. 


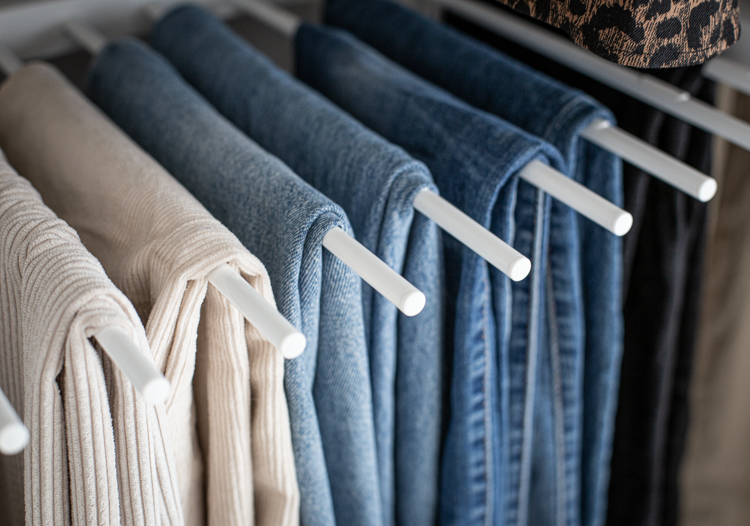
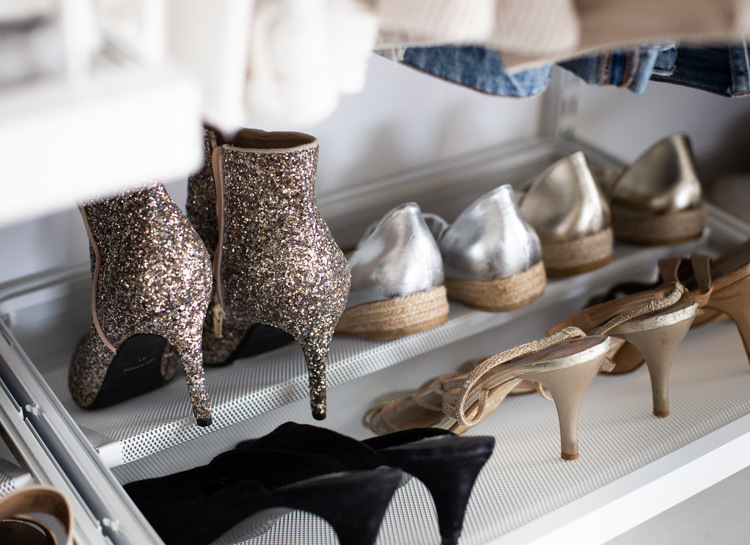
I particularly love the Décor gliding pant rack and gliding shoe mesh shelf. How smart and practical are they? Only the best for my gold sparkly boots! 


Over to the opposite side of my wardrobe and guess what? 


Tadaaa! I have a special place to do my hair and make-up!


This is thanks to a click-in Décor mirror and accessory shelf for all my brushes, make-up, perfume etc. I also picked up a jewellery box from the Elfa studio in Malmö

So much more relaxing to get ready without someone else on the loo behind me (not kidding!). 


Underneath, two different sized mesh drawers with Décor drawer fronts provide storage for everything from scarves, sunglasses and purses to lingerie and nightwear. I chose the knob with leather pull.

I added a soft drawer accessories tray to the upper drawers and then simple mesh metal dividers to the lower drawers - all of which help to keep the drawers neat and organised! 


Don't mind me while I hang out around my new dream wardrobe picking out jungle-style clothes and generally admiring ow neat it is! I've got no excuses now not to use a wardrobe instead of a chair at night (gaaah!) and up my style game. Oh, the pressure! 

I hope you found this wardrobe build interesting / inspiring - especially if you are looking to organise a room in your home. If so, check out Elfa and find your nearest store here - they ship pretty much worldwide. 

Next step: Allie's bedroom. Back to the planning tool! 

I look forward to sharing the results with you in early June!

Niki

Photography: Niki Brantmark

Twitter FaceBook

Pin It
14

Tuesday DIY: a fab walk-in wardrobe on a shoe-string

In the first chapter of The Happiness Project, Gretchen Rubin talks about how de-cluttering and organising your home is the first step to feeling happier. I have to say, I admire people who make organising spaces look so effortless. One girl who knows her stuff is the talented interior designer Nina Holst from the Norwegian blog Stylizimo. She created this fab DIY walk-in-wardrobe on a shoe-string budget.


Nina Holst, Stylizimo with kind permission

I spy two MALM chest of drawers, the STOLMEN used as a clothing rack, BYGEL which nina spray painted herself in gold, and two LEDSJÖ lamps all from IKEA.

To read more about how Nina created this space you can check out the original post here.

I would love to organise my jewellery and sunglasses in the same way in my dressing room. Thanks so much for the idea Nina! For more cool wardrobe inspiration you can always check here.

And if you're up for other DIY ideas this week you might want to check out this simple dotted wall, a cloud shaped door mat or a wall clock using a leather belt. So simple yet so cool. 

We are traveling South (in Thailand) tomorrow so I am handing the reigns to Dagny of Icelandic blog Feel Inspired for the day. Have a lovely day and I'll be back Thursday!

Twitter FaceBook

Pin It
12

10 fab ways to decorate your home with clothes

It's no secret that us girls love a walk-in-wardrobe. But sadly for men, clothes are creeping into the bedroom and acting as the latest wall space accessory too. From necklaces and dresses to shoes and bags, it's the walking-wardrobe. And I love it. 

New York stylist Mary Alice Stephenson's jewellery chest designed by Closet Factory via The Coveteur    
IKEA Livet Hemma

Via Wit and Delight

Via Xunya

Via Brunch at Saks

Via Atelier Rue Verte

Via Cherry Blossom

Via interior photos

House to Home

Adler & Co by A Merry Mishap

I love so many of these ideas. The layers of IKEA mirrors. Using cornicing as shoe holders - perfect. The motorbike sure beats a chair to throw all discarded clothes over or? How far would you go? Sometimes less is more perhaps, it just depends on how fab your wardrobe is!

PS I've hoarded all these pics in Pinterest have done my best to credit but unfortunately not all roads to lead to Rome so if you can give any tips on original publishing house / photographer / stylist I'd be sooo happy. Tack tack!

5 Clever IKEA Hacks to Steal From a Danish Home

You might recall the name Puk Munch Sjeldan from my feature about a tiny Copenhagen apartment that's big on handmade design a while back. That apartment is now occupied by her daughter Luna, so the Dane has turned her hand to her own home - transforming it room by room into a wonderful living space. Dating back to 1904, and located in the suburbs of the Danish capital, the family home is full of fun, quirky pieces, pops of colour as well as books and art. But it's Puk's IKEA hacks that really caught my eye! Here are five ideas to feel inspired by: 

1. Designer Table
Puk added a 90 cm x 190 cm sheet of plywood (painted white) over an existing GÖRAN table using angled metal brackets to transform a budget fold-away piece into a sturdy designer table! 


I couldn't see any hacks in the sitting room area - but knowing Puk there are no doubt some lurking somewhere. I couldn't resist sharing a couple of pictures all the same, as it's so unique! Love the blue 'bold stool' by Moustache in particular, how about you?

2. PAX wardrobe with customised doors
A friend of mine pointed out that the issue with IKEA wardrobe doors is that they never extend all the way to the floor (which would give them a much cleaner look). Puk solved this by adding her own, longer ones, using plywood cut with a circular saw (you can also ask your DIY store to do this for you). She matched the holes with the original PAX wardrobe doors so that she could reuse the hinges. See more details about the hack here

It may not be an IKEA hack - but I can't tell you how important it is for your neck and back to ensure your screen is at the right height when you're working from home. I love how Puk has used a stack of books to give her laptop a lift! 

3. Striped stool 
Puk took 30 minutes to transform a little FROSTA stool into a designer seat using a layer of foam / polyester batting, fabric and a staple gun! See all the steps in her Instagram 'DIY' highlights on instagram if you'd like to know more.  


4. Bed with storage
Puk and her beau used the IVAR 3-drawer dresser to create a bed with oodles of built-in storage. Looking at the DIY steps in her Instagram highlights (you can also find a tutorial on YouTube here), it's one for the more hardcore DIYers among us, but it's fun to know it's possible with a little work! 

No DIY hack to be seen here in the bathroom (that I know of), but it's always nice to share more of someone's home for inspiration! 

5. Hallway storage
I spy a set of four MOPPE storage chests mounted on the wall to create a larger storage unit that's also slim enough for narrow spaces. Perfect for all those bits and bobs like keys, wallets etc! You could also paint them to match your walls so they really blend in. 

Did any of these DIY IKEA hacks catch your eye? 

I love the table - GÖRAN is only around 40 euros and a piece of PLYWOOD / MDF is also very budget friendly. Such a great idea! 

You can see more of Puk's home and discover more IKEA hacks / DIY ideas over on her instagram

Feeling creative? Here are a few other ideas: 


Vi ses imorgon! 

Niki

Photography: Puk Munch Sjeldan

Twitter FaceBook

Pin It
7

Allie's Bedroom Makeover - From Tween to Teen!


Paid partnership with Elfa, all words are my own and I only ever work with brands I love and think you will too. 

The thing about children is that one minute they're tiny babies, the next they're whizzing off on adventures with friends! Take my daughter, Allie. She's turning twelve this October! Where has the time gone? Always a ray of sunshine, she can't go two steps without a cartwheel and loves to ski, play football (that's soccer to all my American friends!) and lately, has become passionate about fashion and interiors (hmmm, I wonder who she gets that from?). 

Needless to say, she grew out of her bedroom a long time ago - and a makeover was well overdue. Since I promised 2022 would be the years we'd organise our home (with my new wardrobe checked off the list last month), one of the key factors would be to ensure it had plenty of storage! It would also need to cater for Allie's needs - and of course, reflect her personal style and wish list. 

Before

I told you our house is messy / disorganised! I'm surprised there wasn't a pair of pants (UK version) on the floor! Chaos aside, this side of the room was dominated by low storage which was crammed with books, toys, cuddly bears and a load of other bits and bobs. 

I've noticed that the toys have slowly started to collect dust and her room has become a place to hang out with friends, do homework and experiment with fashion, hair and make-up - in between making TikToks and doing backflips on her bed - not always in that order!

I asked Allie what she felt was missing and we narrowed it down to:

- A desk area with drawers 
- A pinboard for small pictures, notes and general inspiration 
- Book shelves - with book ends! 
- A dressing table 
- Good lighting 

Oh, and the look and feel should have a hint of boho with lots of greenery, natural material and plants! 

Planning 


Above is the original design, which was created using the Elfa drag and drop online planning tool. Once the items arrived, we rejigged them a little to make use of the natural light (that's one of the beauties of Elfa - it's a flexible system so you can constantly adapt it according to your needs as well as add items over time). 

After 


Just like the wardrobe system in my bedroom, this shelving system is centred around a series of vertical rods, to which you can click-in a whole tray of items such as shelves, drawers, clipboards, mirrors, hooks and more. For a children's bedroom it's an absolute dream! Here's a breakdown of the items we added: 

The desk area


Above the desk we added a Storing Board with attachable hooks and boxes for small items like pens, paperclips and scissors (Per always marvels at how many 'tiny' items the girls amass, all of which are apparently crucial!). 

I particularly love that the desk height can be raised as she grows!


mesh basket under the desk is used to store cables (her room is officially neater than my office!). 

And we also added a series of deep wire drawers with Décor fronts for all her notepads, paint etc. 

The shelves 


To create the shelving, we used a series of melamine shelves mounted on click-in brackets. Lesser used items are / old photos etc which Allie would like to save for the future have been stored away on higher shelves (we might buy a small footstool which could double-up as the dressing table stool) and the things she uses daily are within reach on the lower shelves. 

One of the niftiest items we discovered is the reversible shelf / tray which can be used as a shelf for plants etc or a tray for paper, prints etc with a ridge so they don't slide off.  


We also used a series of book supports and wallbands to stop tomes and other items from falling off the shelves (you haven't seen the chaos when Allie does gymnastics!). 

Sidenote: have you read 'The Boy, the mole, the fox and the horse'? It's the sweetest book and a Brantmark family favourite! 

The pinboard 


I made the pinboard using a cork board covered with stretched linen.  


Slim hooks that click into place created a place for hairbands, necklaces, sunglasses... you name it! 

The dressing table 


A dressing table was highest on Allie's wish list! She's actually not allowed to wear make-up outside of the house yet, but she loves to experiment and have fun with it at home!

To create the dressing table area, we added a Decor Mirror - which is the same as the one I have in my new wardrobe. We also put a reversible shelf underneath it for nail varnish, brushes etc and a series of clear boxes (from the Elfa Studio in town) for make-up, jewellery etc. A simple lamp above lights up the area after dark. 

The drawer underneath has been fitted with a Decor accessory tray so that Allie has a place for her bits and bobs like earrings, hairbands, purses etc. 


And finally, we hung a Bracket hook rack on the side for her bags. 

Oh, how I'd have loved to have had this setup when I was a kid! 

The best thing of all, is that it's created so much space in the rest of her room, perfect for phase two of the make-over - rumour has it, Allie's planned a gallery wall with Per's old LPs, a garland of trailing ivy and there was a mention of a lava lamp! I'm looking forward to seeing the boho look unfold!

Oh, and in case you're wondering about the keyboard, there's space for it on the long desk but she might also use a stand instead. 

I hope you like the results as much as Allie does! Please do give me a shout if you have any questions - or if you have a children's room to plan, you can find out more about this system over at Elfa

I hope you have a relaxing, fun weekend planned. I'm heading off to Stavanger, Norway this evening to write a city guide for an English magazine - very exciting, Norway is my favourite country in the world! I hope I can squeeze in a trip to the fjords and a hike on the Saturday. If you'd like to follow along, I'll be sharing my trip on Instagram stories. 

Trevlig helg! Have a great weekend! 

Niki

Photography Niki Brantmark / My Scandinavian Home

Twitter FaceBook

Pin It
12

Subscribe to My Scandinavian Home

skovby ad


site by ANAAR

This website uses cookies to ensure you get the best experience on our website.
MORE INFO