Scrolling

Our Wood Floor Update: It's Finished!

You might recall back in the spring, Per and I realised that the wood floor in our open-plan living area had finally bitten the dust. No amount of sanding, waxing and glue could rescue it. I was so grateful to hear all your thoughts on which style of wood floor to go for (it's a minefield as the options are endless!). After A LOT of deliberation, we finally chose Cured Oak LYBY wide plank (28cm) with a rustic, white matte lacquer finish from Swedish brand Bjelin. The reason: most of all, we fell in love with this particular wood floor. But also, it's easy to install (see my post of us in action here), really hard-wearing (with a messy family of five this was essential!) and made of renewable raw materials.  

Originally, it was a toss up between parquet flooring and wide planks - I've always loved both styles but in the end, we opted for the wide planks since I knew they would fit with the contemporary feel of our home and bring an element of calm to the living space (trust me, an open-plan living space with three kids around can get pretty hectic!).  We also chose a light wood as it's a pretty dark room, especially in the winter and I have to say, the white lacquer finish has given the room an instant lift! 

We're so thrilled with it! The only problem is, that decorating always seems to have a knock-on effect: update one thing in your home and then other things beside it start to look dated! Do you find the same? Don't tell Per though - he's only just recovered from the installation!

I hope you like our new wood floor as much as we do! 

You can find more details about it here - and see how our room looked before the renovation here. In case you're curious about laying a wood floor yourself, read Per's best tips!

I'll be back tomorrow with a very exciting home tour - please do pop back as I'd hate for you to miss it. In the meantime, I'm sending sunny weather vibes from Sweden! 

Niki

Thank you so much to Bjelin for partnering with us in this project, it made the whole renovation so seamless. All words are my own and I only ever work with brands I absolutely love! 

Twitter FaceBook

Pin It
15

Before and After: Our Laundry Room Make-over


Paid partnership with Elfa, all words and pictures are my own and I only ever work with brands I love and think you will too. 

Do you have a neglected room in your home? Despite living in our house for almost fifteen years (wow, has it been that long?), we've never touched our laundry room (except of course, to do our laundry!). 

It's situated on the middle floor beside the bathroom and bedrooms and is a small, windowless room - even so it's an absolute godsend!

At the beginning of the year, I declared that this would be the year we'd finally organise our home, and so far, we've created a new wardrobe and sorted Allie's bedroom. And now it's time to give our laundry room some tender loving care, with a little help from Elfa, who make super smart storage solutions. 

Here's how we transformed the room from an unloved space to a fresh, beautifully smelling and practical laundry room. 

Before 

'Don't air your dirty laundry in public' - so the saying goes. Thankfully, everything in these pictures is clean. Even so, it doesn't make it any less embarrassing! 

A narrow space, our laundry room has bright blue tiles on the floor, a row of simple hooks along the wall, and a drying rack hanging from the ceiling. The latter was probably our biggest bug bear as it swings around when you try to hang clothes on it, and Per constantly bangs his head on it while ironing his shirts. 

Stowed against the wall, the ironing board (which is desperately in need of a new cover - cringe!) often slides down in the night making an alarming clang.

On the opposite side is the washer and dryer as well as shelves where we keep bedlinen and towels (and the odd rogue item such as er, sunhats!). There's also a handy sink and cupboards which we rarely use as they're quite hard to get to beside the hanging dryer. 

OK, embarrassing moment over. Time for the fun bit: the transformation!

The plan


Wall mounted storage
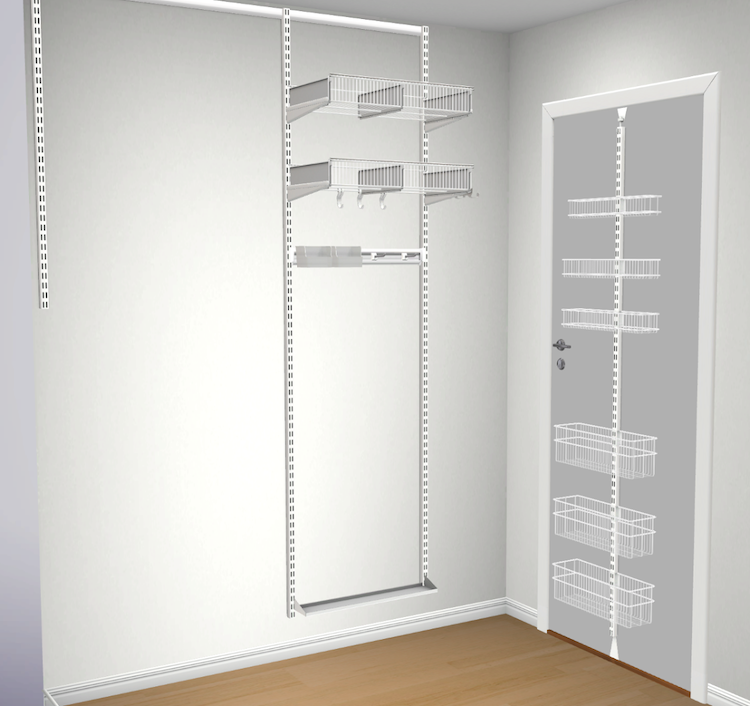
In a small space like this, wall mounted, flexible storage is key. Elfa helped to design this highly functional formation for us.  The beauty of this system is that it's centred around wall hung tracks to which you can click-in all kinds of units and accessories such as shelves, drawers, hooks etc. You can also add to the arrangement over time. 

The wide section on the left is for two wall mounted clothes dryers and on the right, we'll have space for wall mounted shelves and hooks. 

We actually opted for one central bar in the end - but if you're inspired to do something similar and would like to make your space even more practical, you could opt for two central brackets to make your drying shelves even more adaptable to the space. 

On door storage
I've had my eye on the on door storage ever since my first post about Elfa. Centred around a central bracket, the baskets can be moved up and down. You can also add hooks. It's perfect place for all our laundry soap as well as other accessories. 

Prepping the room


We wanted the space to be more in keeping with the rest of the home. It can be really costly to re-tile, so instead we bought a special V33 tile paint which is especially designed for bathrooms. Per and I applied several layers to the wall (white) and floor (light grey). I've actually never tried a tile paint before and I'm amazed at the results! 

The next step was to lighten the shelves and worktop. To do this, we sanded down the oak before applying a special white oil wood treatment and finish by Osmo

And finally, we painted the rest of the room white before the ELFA units were installed. 

After


Tadaaaa! Can you believe this is the same laundry room? 

To the right of the room is the Elfa storage. We added two drying shelves, a wire shelf, a wire shelf basket, a storage track, storage track hooks and a clothing accessories kit

Collapsible drying shelves


Above you can see how the drying shelves collapse against the wall to make room for other things like sorting clothes and ironing. We can also change the height or remove them entirely. 

Shelves and hooks


The high shelves are ideal for extra storage (the storage boxes are part of a set from the Marie Kondo collection from Studio Elfa in Malmö).  

One of my favourite things is that now we can hang the iron from hooks. Oh, and did you notice I changed that gross ironing board cover to a new gingham one (from IKEA)? 

I also swapped out the old laundry baskets for a pretty rattan one (there's another laundry basket in the cupboard opposite for 'overflow' - we're a family of five, after all!).

Meanwhile, on the other side of the room...


The lighter wood, white tiles and light grey floor have really helped to freshen up the space. 

I also changed the door handles (it's all in the details friends!) - these are called Knob Helix, you might recognise them, as I have the same ones in our cabin kitchen.  And I picked up the baskets in town to store our bed linen and towels - so much neater! 

Door storage


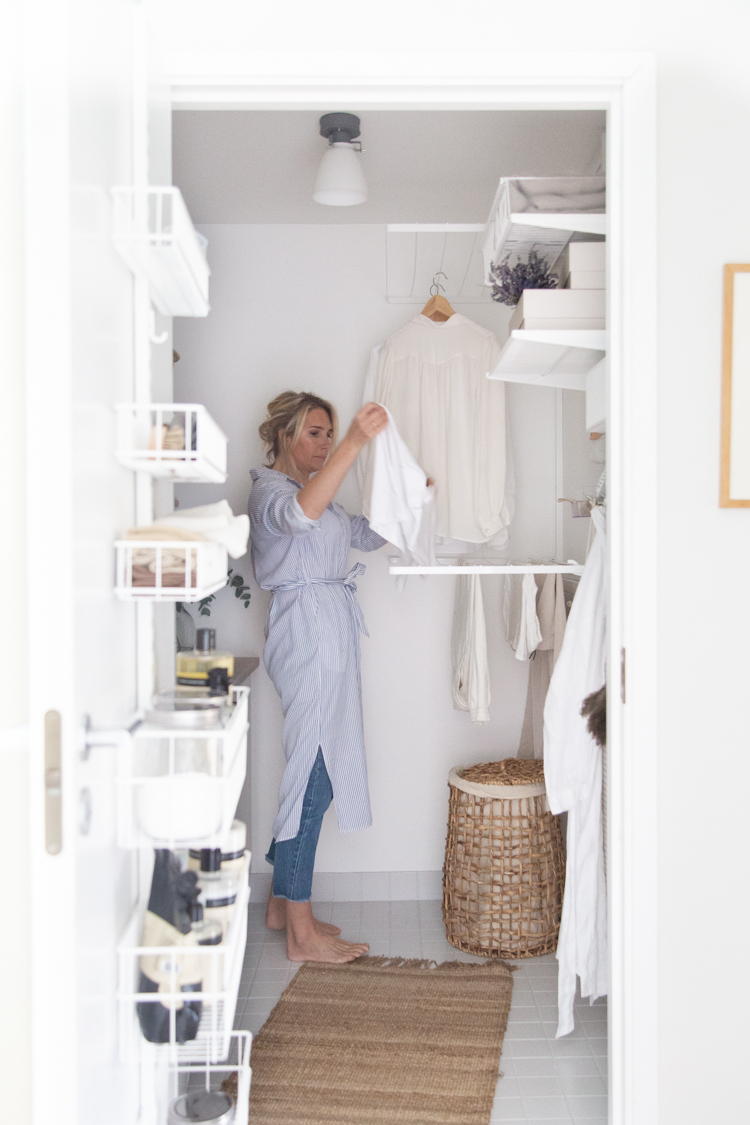
Last but not least, the wonderful door storage is made up of a series of wire baskets which click into place. It's made space for all our laundry soap (I love Humdakin), cloths and other items - leaving the area around the sink clear. 


And there you have it, our new laundry room! 

Who would have thought that a room like this could bring so much joy (never thought I'd say something like that)? 

I hope you like the transformation as much as we do! 

Next step... the attic (gaaaah!). 

In the meantime, if you're in need of more storage at home, have a play arounds with the Elfa online 3D planning tool, or seek help from Elfa professionals (available pretty much worldwide) - you'll have your home organised in no time! 

If anyone's looking for me this weekend... I won't be hanging out here in the laundry room, hopefully, but I am thrilled with it! 

Have a great couple of days and see you Monday! 

Niki

Photography: Niki Brantmark / My Scandinavian Home
Styling: Helen Sturesson 

Twitter FaceBook

Pin It
26

Before and After: Old Stables Become a Beautiful Country Home


Come on, own up! Who frequently fantasises about buying a run-down property / wreck and doing it up? I totally confess to dreaming about this on a monthly basis. Especially when I see some of the incredible transformations out there. And today, I think you're going to feel hugely inspired by the home of Anna-Lena in Lower Saxony, Germany. I think we can all agree that there is such an incredible amount of work that goes on behind-the-scenes of any property renovation. Which is why 'before', 'during' and 'after' pictures are a great reality check, but also inspire. It's quite incredible what vision, hard work and of course, a solid budget can do! Ready to feel inspired? Here are some pictures of Anna-Lena's home - which has slowly been transformed from dilapidated stables into a beautiful, rustic, modern country home! 

Exterior before 

A lot of the exterior was covered in plaster when they first purchased the property. This was carefully removed to reveal the original brickwork.  The entrance has also been modernised and new windows have been installed. 


Main living room - before


Wow! In the above picture you can really get a sense of how the stables looked before the renovation. It was a completely open shell and the stalls are clearly visible. 

The main living space was transformed into a well-insulated living space with a reinforced ceiling to allow for a second floor. 

Main living space - after


The wonderful Clou-Xtra wood-burning stove creates a focal point, while the concrete floor and beautiful wood ceiling add character to the space. 


The darker, clean and contemporary kitchen creates contrast and a sense of drama to the room, while the wood farmhouse table adds warmth and a rustic touch - pertaining to the past. 


Stairs were installed in the back corner of the stables for access to the second floor. 

Master Bedroom with En suite - During! 

Insulation work was carried out on the roof and two VELUX skylights were added to slip in light over the bath. The entire floor was re-constructed and a new wood floor laid. 


Master Bedroom and En suite - After

The beams were preserved to add character to the space and a new wood floor adds a light, modern touch to the space. Natural textures seen in the plant pot and bedding (you can find similar off-white bedlinen here*) help to add depth and warmth to the overall look. The storage is a mix of modern (IVAR from IKEA) and a large vintage wardrobe. 


Bathroom - Before


The room that the second bathroom occupies was non-existent and needed to be created from scratch, which shows the extent of the work put into transforming the building into a liveable space! 


Bathroom - after

The bathroom design is relatively simple yet texture from the wood, the subtle plaster finish behind the washbasin and the beautiful vintage unit help to add interest and warmth to the space.


Hallway / Entrance  - After
A barn door offers a wonderful nod to the history of the building, while the simple, rustic aesthetic is keeping with the rest of the property.

From what I understand from Anna-Lena's instagram, there's a lot more renovation work to be done. And I for one, will be following their journey! 

If you're keen to see what they do next, keep an eye out for updates here: @house.no1

Looking for more 'before and after' / renovation inspiration today? Check out these incredible transformations: 


Could you imagine taking on a project like this? Even if you're not quite ready to take the plunge (or perhaps it's simply to your thing, which is entirely understandable!), I hope seeing these before and after pictures have left you feeling inspired all the same! 

Vi ses imorgon! 

Niki

Photography: Anna-Lena / @houseno.1 shared with kind permission
*This post contains affiliate links

Twitter FaceBook

Pin It
9

In Malmö, Gen's Inspiring Home Office / Guest Room Refresh


It's been a while since I visited Gen - and it's always fun as she's constantly updating her home! This time it was her home office that's been given the make-over treatment. For those of you who are new to My Scandinavian Home, Genevieve Jorn (@genevievejorn) is an ÜBER talented Canadian interior designer living in Malmö. I've been lucky enough to collaborate with Gen many times over the years.  I captured her home office a few years back. As beautiful as it was, it was fairly dark, and this room is quite narrow and doesn't get a whole lot of light. Recently, Gen replaced heavier dark details with soft, neutral textiles and touches of light wood and rattan and it has made a huge difference! A large white ergonomic desk stands in the centre of the room. The space also serves as a guest bedroom when friends and family are in town and when they're not, the bed becomes a perfect place for afternoon siestas or a quiet spot to read! I took my camera along to snap a few pictures...


Isn't it lovely? I seriously could have stayed all week (taking the occasional nap on the daybed!), it felt so serene!

If you're considering converting a room in your home into an office / guest bedroom I hope it's given you lots of inspiration! Here's the low down on where some of the items are from:


GET THE LOOK
1. Studio Paradissi Pebbleface 04*
2. George and Willy Studio Roller
3. Ikea Ivar Cabinet
4. Grupa Arigato Table Lamp
5. Ikea Skarsta Desk
6. Ikea Långfjåll Chair
7. Studio Paradissi Abstract 402
8. SandSnow Linen White Linen Curtains*
9. H&M Bamboo Mirror
10. Tell More off-white Linen
11. Ab Småland Crinkle Sand Sheets
12. Gurila Portrait M
13. Grupa Arigato Wall Lamp
14. Kummin Cushion Linen Cover
15. Pismo Rattan Side Table

Also seen (on floor): Malene Birger No 03 print and Rubin Studio Composition 03

The wall colour is Antique White 1016 from Jotun lady.

Gen's used the white Arigato wall lamp and table lamp from Grupa - I like the way this brings the different corners of the room together (and there's no denying that they're pretty amazing lamps too!).

Curtains are often tricky but Gen found her beige* and white* ones at SandSnowlinen* on Etsy. They make lovely custom-made linen curtains to order.

Just wondering if there is anything else important to mention. Ah yes! The drawers under the bed - did you spot them?! They were salvaged from a vintage chest of drawers that Gen was throwing out. Love this idea!

You can also take a peek at Gen's bedroom, living room, kitchen and daughter's bedroom.

Have a wonderful day!

Niki

Photography: Niki Brantmark / My Scandinavian Home Interior design: Genevieve Jorn

Thank you to SandSnowlinen*, George and Willy, Grupa and The Poster Club* for contributing to this post. 

*Affiliate links

Twitter FaceBook

Pin It
1

Subscribe To My Scandinavian Home

Subscribe to My Scandinavian Home

skovby ad


site by ANAAR

This website uses cookies to ensure you get the best experience on our website.
MORE INFO