Budget Makeover: A Boiler Room Becomes a Lovely Guest Bedroom


At the cottage we have a garage with concrete walls and lots of spiders and I sometimes look at it wistfully, wondering if it could be transformed into a guest room. Have you got a basement, unused, neglected garage or other room that's currently uninhabitable but has potential? if so, like me, you might feel incredibly inspired by Anna Truelsen's latest budget DIY make-over! 

I've featured Anna's home several times before on My Scandinavian Home, and now the Swedish interior stylist has turned her hand to the boiler room. Formerly a dumping ground (just like me attic!), Anna could see the potential in her boiler room as a guest room. Read on to see how it looked before and how they revamped it by hand on a budget. 
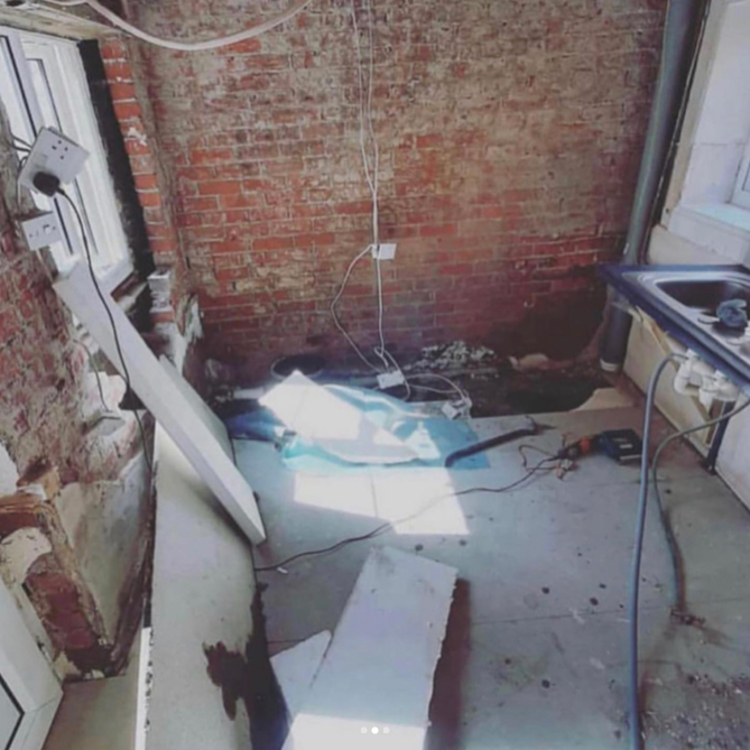
Before

The boiler room is in the basement of Anna's home. Despite being relatively large, the concrete shell is a dumping ground for building materials, household items and other bits and bobs. 

The first step was to clear out the room and then Anna set to work removing the crumbling plaster. They then removed a couple of pipes and re-plastered the walls and ceilings. Once dry they painted the walls, ceilings and exposed pipes with a fresh lick of white paint. 

After

What a transformation! 


They washed the original concrete floor before adding a series of fluffy rugs for a cosy touch and to dampen sound. A simple linen curtain was installed to hide the boiler system. 

A small amount of light slips in through a window on the left, simple touches like mirrors, candles and a light (all vintage) help to supplement the natural light, while cushions (which Anna made from an old rug that she bought in Marrakesh many years ago) add a homely feel. 

I also love the natural linen bed spread (source a similar natural linen one here*).  

An old Thonet chair* serves as a bedside table. 

A classic Swedish candle (source similar vintage brass candleholders*) adds a warm touch to the room.

***

Truly inspiring, and evidence that our cottage garage could become a wonderful guest bedroom after all. We just need to find somewhere for all the clobber first! 

I hope you've felt inspired by Anna's boiler room makeover too!

If so, you might also like to checkout: 


Stor kram! 

Niki

Photography: Anna Truelsen, shared with kind permission
*this post includes affiliate links which means that if you click on the link and buy something I will receive a small amount of money. 

Twitter FaceBook

Pin It
5

Before and After: A Victorian House Becomes a Warm and Cosy Home


Autumn always makes me feel really nostalgic. I think it's the crispness in the air which reminds me of going back to school after the summer holidays, collecting conkers in the wood behind our house and kicking leaves on the way home. It also reminds me of running onto a frosty hockey pitch in my PE kit (shorts and and a very airy t-shirt - i.e. not designed for the weather). 

It was this mostly romantic train of thought which led me to today's home - Harnham House in Salisbury, Wiltshire UK. Dating back to 1880, Hannah and her partner Ollie moved into the Victorian property in spring 2018. Previously a rental, the house was in fairly good condition but still required a lot of work. Hannah and Ollie set about renovating the space, taking four years to transform it into a warm and cosy home. Ready to see the before and after pictures? 

Kitchen before 

The kitchen needed to be completely gutted.

Kitchen after

Hannah and Ollie installed a kitchen from DIY kitchens. Open shelving on the back wall helps to create a relaxed feel, while a rail from DeVOL makes space for utensils. 

The walls have been painted in Pure Brilliant White from Dulux. 


Dining area before

The Victorian features such as a brick fireplace had been covered up under layers of plaster. Hannah and Ollie peeled back the layers before painting the chimney breast white. 

Dining area after

The original wood floor was given a new lease of life, and an efficient woodburning stove was added to the fireplace.  The recessed walls on either side of the fire have made a great place for storing firewood and table linen as well as other pieces. 

The walls in the recess have been painted a subtle 'blanc de blanc' by Valspar paint.

Stairs and hall before

The hall floor and staircase were peeled back to the bare bones. 

Stairs and hall after

Beautiful wood panelling with a built-in shelf (painted in Lick green 01) was added to the hallway. Beneath, a bench and shelving make space for shoes, accessories and other items. 

The stairs were given a white lick of paint, leaving a central strip of exposed wood for the tread. Meanwhile, a snoozing dog guards the foot of the stairs, while Hannah and Ollie sleep. 

Meanwhile, the family cat has bagged the guest room (in true feline style!). I don't blame her, it does look like a lovely, calm place for some shut eye! The walls have been painted in Dulux 2510G90Y, which makes a great backdrop for vintage and antique furniture. 

What a beautiful transformation! 

Everything looks so warm and cosy. I can imagine it really comes into its own in Autumn time! 

Did you spot the cat? 

I'd love to hear your thoughts - do share below. And also, do you feel extra nostalgic in autumn? If so, what kind of memories does this season conjure up for you? 

See more Hannah's home over at @hanhamhouse (they still have some rooms left to renovate). 

Would you like to see a fee more British homes today? 


This cabin isn't in England, but it popped up in my feed earlier and it's so worth re-visiting: 


On an entirely different note, and in view of 'candle season' being upon us, Per was at a seminar held by the Swedish fire brigade yesterday.  based on all they have witnessed and various studies, they advised having a smoke detector in every room in the house including all the bedrooms. In addition, they said a fire extinguisher in the kitchen is essential - do you have this in your home? Apparently, IKEA have inexpensive, yet good smoke detectors). I also have my eye on a nexa or solskiden fire extinguisher (hey, who said an extinguisher can't be beautiful?). Stay safe friends. 

I'll be back on Friday to share an autumn update in my sitting room - I hope you're going to like it!  

Niki

Photography: @hanhamhouse shared with kind permission. 

Twitter FaceBook

Pin It
10

An Abandoned Property Becomes a Beautiful Swedish Country Home


Do you ever walk / drive passed a dilapidated house and dream about transforming it into a beautiful home? I definitely have - I was even close to dropping a note in a mailbox once to see if the owners would sell! But for Lisa and her fiancé Gusten and daughter Lilly this wasn't necessary as the property was already in the family, it just needed a huge amount of tender loving care! Here's Lisa to pick up the thread, and tell us all about the renovation of her beautiful house in the forests of Småland, Southern Sweden in her own words: 

"The house has been in my fiancés family since it was built in 1912. His grandmother's cousins used to live here so she spent a lot of time here as a child. When the old man who lived alone in the house died, my Father-in-law bought the house (and the surrounding forest) and my fiancé started to dream about renovating the house some day."

Exterior before

"When we met, he took me to see the house one June. It had been abandoned several years before, the paint was cracking, and it was in need of a great deal of love and work! 

Exterior after

"As soon as I walked inside, I fell in love with the old floors, original double doors, large rooms, fireplaces, porch and big garden. We were only in our early twenties, but we started to discuss buying the house some day."

Porch before

"In the fall of 2016, we applied a small loan and were able to buy the house. We had just finished our studies and recently started working. We hadn't had the time or means to save any money, so we needed to work with what we had, which meant do everything ourselves."

Porch after


"We started working on the house on the weekends, but quickly realised it would take up all of our spare time, so we started to work on it every evening after work too. We'd stay until sunset, head back home for the night, go to work, before returning the following evening. We spent every weekend, evening and holiday working on it. We also saved as much money as we could - which meant no fancy cars, no vacations abroad -everything we had went into the renovation."  

Kitchen before
"We did everything we could ourselves: changed the windows, renovated the wood on the exterior, changed the water pipes, put in a new bathroom, kitchen etc. We had to learn everything from scratch - I'd never even painted an item of furniture before! We also received a lot of help from family."


Kitchen after

"We renovated in this way for two and a half years, the last nine months of which I was pregnant with our first child. I was painting the house when my waters broke!" 


Sitting room before 

Sitting room after

"It was very  important to us for every detail to reflect the age of the house, while ensuring a modern standard of living. We chose windows in wood - which were specially made to look like the old ones. We restored the fireplaces and renovated and painted the porch in linseed oil so it would last a lifetime." 

Bedroom before 


Bedroom after

"I would describe our style as a mix of Swedish country with touches of mansion glamour. We decorate with lot of second hand furniture and I like to invest a little more in accessories and paintings that will last a lifetime - instead of needing to replace them in the near future. Sustainability is key."


Lilly's bedroom 

"My fiancé and I and our three-month-old daughter moved in to the house in the spring of 2019. It wasn't ready but it was in liveable condition." 

Bathroom before

Even though we've lived here for quite a few years now, the house still isn't finished. We have a lot of projects left - for example, there's a lot of work left to do on the garden, and we need to renovate the outhouses. We see this house as a lifetime project. It's our dream home and the place we're looking forward to raising our children. 

Bathroom after

Thank you so much for sharing your story, Lisa! Truly inspiring! 

It feels all the more special looking at the pictures, knowing that so much work has gone into it. 

For more information about Lisa's country home and to follow her latest projects, head over to  @faggemala1912

Would you like to see a few other inspiring renovation projects today? Check out: 


Are you tempted to take on a project like this? Or perhaps you already have? I'd love to hear about your experience below! 

Niki

Photography and words courtesy of @faggemala1912

Twitter FaceBook

Pin It
9

Makeover: Creating My Dream Wardrobe From Start to Finish!


Paid partnership with Elfa, all words are my own and I only ever work with brands I love. 

Remember I said this was going to the year I finally organise my home? I've moved one step closer - my new wardrobe is finished! 

Allow me to paint the scene. My previous wardrobe was sandwiched between the girls' bedrooms on the floor below, it was really small and cramped and I had to tip-toe through their rooms at night. I could never find anything; it simply wasn't practical in any shape or form and honestly, a total mess!

The far side of our bedroom on the top floor seemed like the obvious choice for a new one. In the past, this corner a reading corner, yoga studio and even once graced the cover of a book as my home office! But I've never really felt it's been put to great use - until now! 

The problem was, it's a slightly awkward spot: sandwiched between the stairs and a large radiator - plus it has a sloped ceiling. 

Here's how I transformed it with the help of international Swedish brand Elfa

The brief
I had an entire jumble of items that needed a home - from maxi dresses, jumpsuits, sweaters, jeans and gym kit, to hats, tights, jewellery and lingerie! Since we share a bathroom between five of us (two of which are teenagers) I was also keen to incorporate a little spot to do my hair and make-up. A girl can dream!

The obstacles


Radiator
This mighty radiator was in the way. To be honest, we hadn't used it all winter since I like to keep the area cool for my beloved lemon tree (AKA my fourth child!) while it winters indoors. Removing it was a no-brainer, so we called the plumber in. It left a gaping hole which we plugged and painted over.  

Bannisters
The bannisters to the left of the space were also an obstacle. In the end we decided to build a short floor-to-ceiling wall to frame the side of the wardrobe. 

Angled ceiling
Probably one of the most common problems when building a wardrobe is an awkward sloped ceiling. We hired a builder to insert a made-to-measure triangular shaped wood piece above the open-topped wardrobe. It was painted the same colour for a seamless look. The best thing about this is that we can use the full height of the room for storage. 

The design
The beauty of Elfa is that the system is fully flexible and can be adapted to fit your space and your needs. Plus, they offer a great online planning tool which enables you to easily design and plan your wardrobe to the exact measurements of your room - love that!  

The system is centred around a series of vertical rods from which you 'click-in' your choice of shelves, sliding shoe racks, trouser rails, tie racks, rods, drawers, mirrors, hooks etc. 

Since it's in our bedroom, I wanted to go for a slightly smarter option, choosing a few items from the Décor assortment which combines function and flexibility with the style and luxury of wood. I combined open and closed solutions together with extra features such as a gliding shoe and trouser rack and somewhere to hang shorter and longer clothes. 

Door selection

I chose Forma doors in melamine satin white - a three door sliding solution. There are countless others to choose from (for those of you who live in Sweden, Norway, Denmark or Finland) - or you could go wild and opt for an open solution (I'm WAY too messy for that!).

The results

Once the vertical rods had been installed, everything else could just be clicked into place. Most of my wardrobe is made up of wire shelves with Décor fascia for a sleek, smart finish. 


I don't know how good you are at folding, but I think Marie Kondo would describe mine as distinctly sub-par! If you're the same, let me tell you, these click-in wire shelf dividers are a game changer. Not only do they condense the width of your folded sweaters making them appear more neat - they also allow you to double up on each shelf so you have room for more clothes. 


A long closet rod means I have place for longer and shorter clothes. And I placed some of my smarter sweaters in boxes from the Elfa studio - love that they can be dust free but still visible. 


I particularly love the Décor gliding pant rack and gliding shoe mesh shelf. How smart and practical are they? Only the best for my gold sparkly boots! 


Over to the opposite side of my wardrobe and guess what? 


Tadaaa! I have a special place to do my hair and make-up!


This is thanks to a click-in Décor mirror and accessory shelf for all my brushes, make-up, perfume etc. I also picked up a jewellery box from the Elfa studio in Malmö

So much more relaxing to get ready without someone else on the loo behind me (not kidding!). 


Underneath, two different sized mesh drawers with Décor drawer fronts provide storage for everything from scarves, sunglasses and purses to lingerie and nightwear. I chose the knob with leather pull.

I added a soft drawer accessories tray to the upper drawers and then simple mesh metal dividers to the lower drawers - all of which help to keep the drawers neat and organised! 


Don't mind me while I hang out around my new dream wardrobe picking out jungle-style clothes and generally admiring ow neat it is! I've got no excuses now not to use a wardrobe instead of a chair at night (gaaah!) and up my style game. Oh, the pressure! 

I hope you found this wardrobe build interesting / inspiring - especially if you are looking to organise a room in your home. If so, check out Elfa and find your nearest store here - they ship pretty much worldwide. 

Next step: Allie's bedroom. Back to the planning tool! 

I look forward to sharing the results with you in early June!

Niki

Photography: Niki Brantmark

Twitter FaceBook

Pin It
14

Subscribe To My Scandinavian Home

Subscribe to My Scandinavian Home

skovby ad


site by ANAAR

This website uses cookies to ensure you get the best experience on our website.
MORE INFO