Scrolling

Maja's Cosy Swedish Home All Decked out for Christmas!

Tjoohooo! I hope you had a cosy weekend! It's been snowy here - and so cold, even the sea has iced over. but I do love a winter wonderland, here in the South we have to make the most of it as we never know when it all might be washed away! Today, I'm stopping by to share a final home tour for 2022 - and it's such a pretty one! 

You'll recognise Maja Olausson's house from a previous post. A former mission house with a charming interior, it's hard to forget! I especially love her home at Christmas when it's all decked out with stars, orange garlands, candles in moss and Christmas trees from a sustainably controlled forest. Oh, and keep a look out for her home made wrapping paper and gift tags as well as her festive table scape - some really lovely ideas here!  So kompis, wrap yourself in a blanket, pour yourself an extra strength coffee (Swedish style!) and enjoy the tour! 

Really lovely! 

Are there any details / ideas that stood out to you in particular? 

I'm impressed by all the details. I have to confess, since we're going to see my family in London at some point during the holidays I haven't done a huge amount at home - but we do have a lovely tree and a few decorations dotted about - as well of course, stars and candles in the window! You can read more about the Brantmark Christmas traditions from Per's perspective here

Have you put up a lot of decorations this year (if you celebrate)? 

For more inspiration today, you might like to check out the Christmas and Christmas decoration archives as well as some of these cosy home tours: 


Kram!

Niki

Photography Maja Olausson, shared with kind permission 

Twitter FaceBook

Pin It
4

6 Pretty Scandinavian DIY Christmas Gift-Wrapping Ideas


Have you finished your Christmas shopping (if you celebrate / exchange presents)? I'm not quite there yet, but I'm already looking forward to the next phase: the gift wrapping! Every year I envisage myself spending hours baking, creating DIY decorations and lovingly making my own wrapping paper. The reality is somewhat different! Do you feel the same? The good news is that in this gift-wrapping round-up there is something for everyone - whether you prefer / have the time to make things from scratch, or would simply like to add a simple, yet pretty touch to your presents! Either way, why not make an evening of it with candlelight and glögg (mulled wine). You could also make up a riddle to go with each present - just like the Swedes do! Here are 6 lovely ideas: 

1. Paper tree - the wrapping above looks highly sophisticated, but just cutting out a long 'ribbon' from the wrapping paper you are using and arranging its in a Christmas tree shape is as easy as can be, and makes a great replacement for shop bought bows! 

1. Paper cut outs - Swede Helena Lyth shows a step by step guide on how to create decorative cut outs in your wrapping paper. 

2. Jingle bells! Little brass bells attached to string will make your pressies chime! I love these rustic bells from Etsy*.  Photo - Nathalie Myrberg


3. Furoshiki - I love the idea of using reusable cloth for present wrapping. See as step by step tutorial here and more Furoshiki gift wrapping ideas here (love the knitted one!) and source natural* and dyed Furoshiki clothes*. Photo - Dans le Sac. 

4. Foraged - winter foliage like berries, pine, boxwood, and eucalyptus add such a pretty touch to presents wrapped in simple brown paper. Photo - Eva Kosmas Flores.


5. Linen and dried flowers - a simple, yet pretty and natural way to wrap presents


What do you think? Any ideas you might like to try? 

See a load more gift-wrapping ideas here: 


Entertaining this weekend? Here are some of my favourite holiday table setting ideas: 


You might also like to see all the beautiful tours, decorating ideas and snowy landscapes in the Christmas archive

Have a cosy weekend!

Niki

Twitter FaceBook

Pin It
6

The Full Tour of Our Tiny Cabin in Sweden!

As the year is slowly coming to a close, I've been looking back at the last twelve months and some of my projects. The one I am most proud of and that gives my family and I an unbelievable amount of joy is our tiny cabin. I absolutely love it. It may only be 30m2 (322 f2), but what it lacks in size, it makes up for in soul! It's hard to imagine that this time last year it was a patch of grass! Here's the complete low down. 

Design

We had a clear vision of how we wanted the cabin to look both inside and out. We turned to talented local architect Anela Tahirovic to help us realise this. Anela was such a joy to work with and sketched a design which perfectly matched our minds eye! 

Inside, we wanted a space where we could be together as a family. We realised that having a separate master bedroom would eat into the main living space, so instead we decided to create an open-plan space with a lower bedroom and upper sleep loft. We also wanted a well-functioning kitchen and bathroom so that it would work as an independent living space. 


The tour!

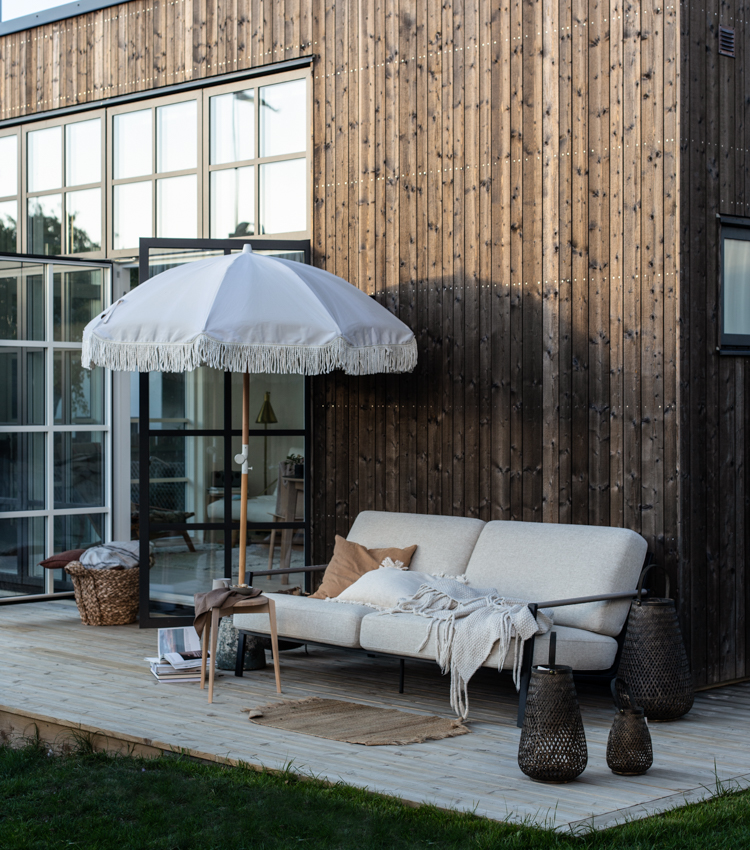
The exterior of the cabin is clad in different widths of pine which have been treated with 'järnvitriol' (iron sulphate) to give the wood a long-lasting grey-brown weathered appearance. 

The glass doors and windows are from Danish brand Velfac. All the glass doors open up to create a seamlessness between the indoors and outdoors in summertime. In winter it's the perfect space for a little 'light therapy'! 

While we love having so much glass, the downside is that it can heat up incredibly quickly come on a hot summers day. To counter this we had to install a heater / air conditioner (from Electrolux). This wasn't in the original plan, but it's actually turned out to be great as we can maintain 10 degrees Celsius heat in winter to stop the pipes from freezing - and quickly cool the space down on very hot days (few and far between but necessary, especially in the upper sleep loft!). 

We also added bespoke blinds to reflect the sun and heat - and also of course, to block out the light at night. 

Meanwhile, in the kitchen... our Veddinge kitchen cabinets are from IKEA and we added bespoke wooden oak shelves, made from panels bought in a local hardware store. We had the cabinets spray painted in Blek Sand (NCS S2005-Y20R) by Swiss Metod prior to installation. The worktop is a simple laminate one from Hornbach. We installed Helix knobs in antique brass from Beslag Online and a tap from Cristina Rubinetterie.

The kitchen also contains a fridge, small freezer, sink, recycling unit and a portable plug-in stove (all from IKEA). See the complete design plans, more pictures and all the details here.  

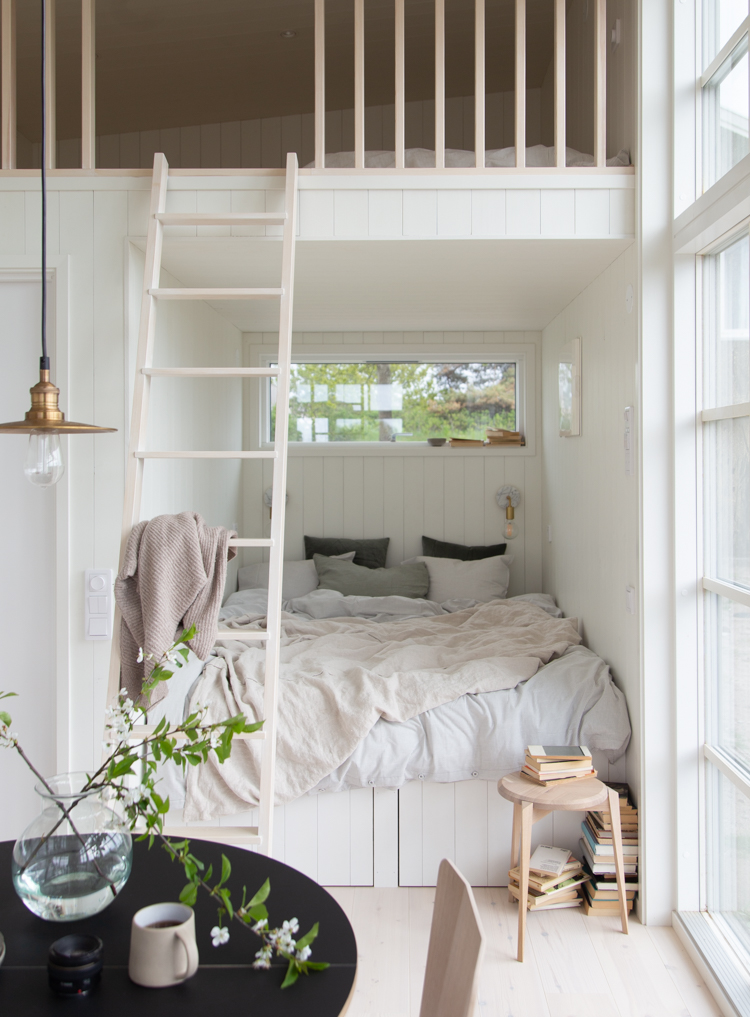
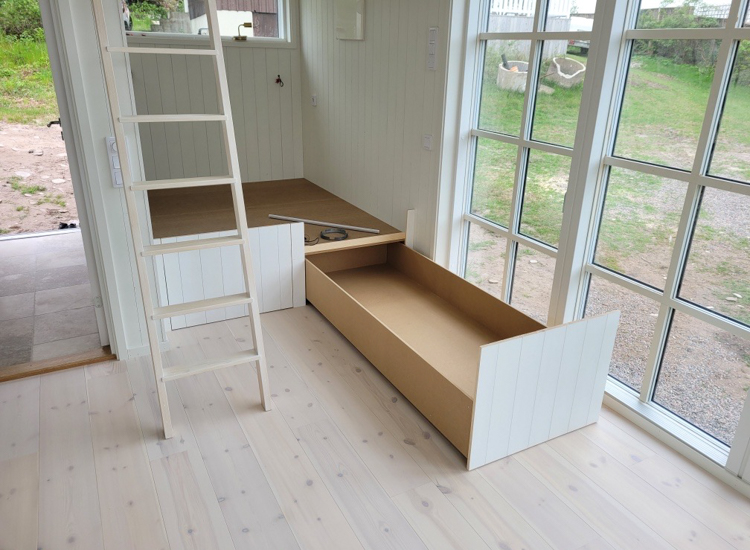
The wooden slats and ladder were handmade by a local carpenter. The ladder is detachable and moveable so it can be used for accessing the sleep loft but also to reach items higher up in the kitchen. 

The wood floor and panelling are both from Norrlands Trä (read more about our selection here). 

The extendable table is by Skovby (see it extended here) and the chairs are from Carl Hansen & Søn (these were only on loan for a photoshoot sadly, aren't they lovely?!) but I can also recommend Skovby chairs and stackable Vega chairs for a table like this. 

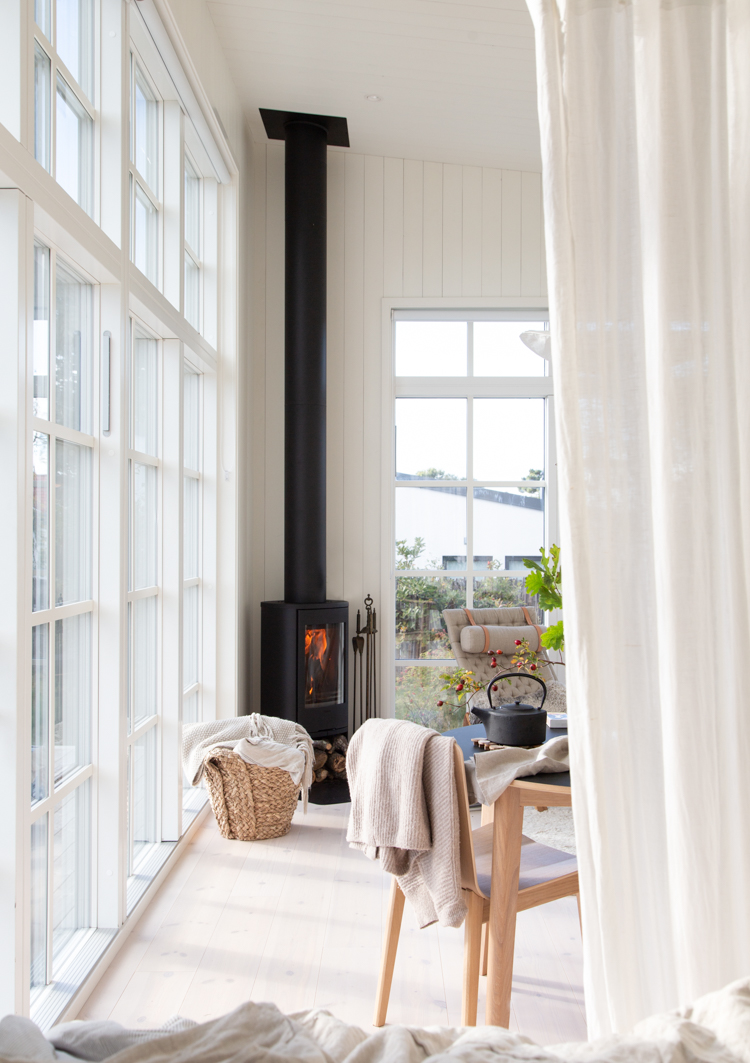
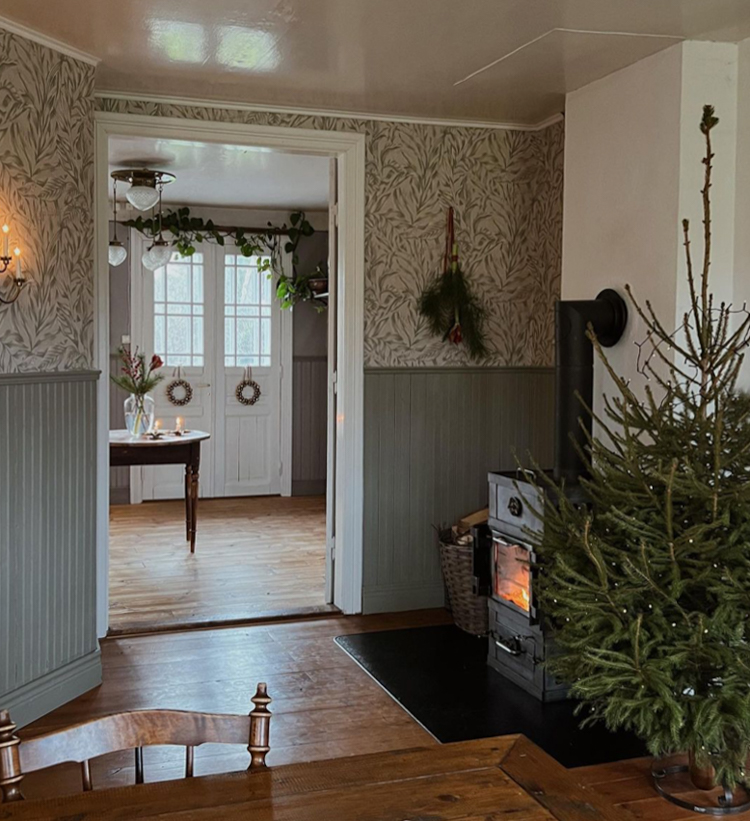
One of the most essential features for us right form the start was a woodburning stove. We got ours from Swedish brand Contura (see more pictures and details here). There's nothing quite like waking up to a roaring fire on a cold winters day! It gives off an immense amount of heat so we haven't had to turn on the electric heating once this winter (bar the 10 degrees)! 

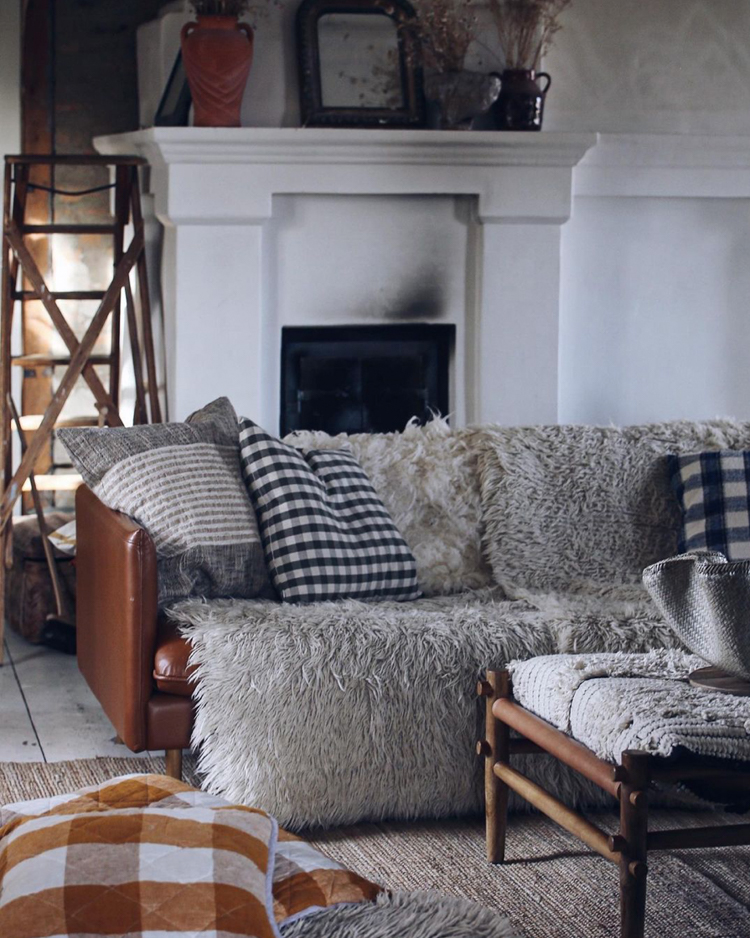
In the tiny sitting room area we have a Plico Chair (possibly my most treasured item of furniture, I love it!). 

We also went for a Folk sofa bed by Karup. It's ideal for extra guests, but also a cosy place to sleep by the fire come winter! 

We've had the rug for years, it's called 'Beni' from Barfuss Teppiche.

Our bed nook is just over 160 cm wide which provides a snug space for a double bed. We decided to have a built in bed with long drawers on wheels underneath for storage. Today we keep everything from our clothes and bed linen to towels, table cloths and games in the drawers. They are a godsend!  

The mistake we made was using a platform rather than slats. Mattresses need to be able to breathe, otherwise they can get damp and mouldy underneath. We try to air the mattress as much as possible to counter this, but at some point we'll need to drill holes in the platform. 

The sleep loft (which I've realised I've yet to photograph) has space for either three single mattresses or one double. The cabin is 4 metres high, which means there is still quite a lot of head room up there. The girls find it very cosy! 

The bathroom is kitted out with a sink, cabinet, mirror and loo from GSI ceramica and taps from Cristina Rubinetterie. The Tumbled Turtle floor tiles are from Stiltje (one of the areas we splurged). The walls were painted in Kalk by Jotun lady Aqua. 

We weren't sure whether to get a wall hung loo and taps or not as I was worried it would eat into the small space. But actually, wall hung was perfect as it create a natural shelf for all our bits and bobs! 


You can see the complete tour and get the full low down of our bathroom here

The hooks in the bathroom (from Norrgavel) serve as both bathroom storage and somewhere to hang our coats. The little stool is either used as a perch to take of your shoes on entering or drying off and moisturising after a shower (pick up a similar little wooden stool here*). 

Finally, the main entrance to the cabin is through the bathroom. We thought we had made a major mistake with this - and we certainly got some strange looks when we told other people about our plan. However, it turned out to be exactly the right decision. Not only do the hooks double up for towels and coats - but the tiled floor is ideal for wet / dirty shoes! Once inside, all the other doors open up so it can be exited and entered through those - it's just when you arrive! 

I hope you enjoyed the tour and seeing a little more of our cabin!

I think I've covered most things, but if you have any questions please do give me a shout below and I'll do my best to help! 

I'm so looking forward to spending a few days up at our little cabin this Christmas! 

Niki 

PS The next project is the garden (it was a complete mess after the build! Gaaaah!). Do you have any tips for me? It's a total blank canvas right now so a little overwhelming! Even so, it's fun to have something to focus on in 2023. 

Twitter FaceBook

Pin It
16

Hanna's Cosy Finnish Country Home in the Snow At Christmas

Hello friends! how are you? Keeping warm I hope? Here in southern Sweden it's minus 7 degrees Celsius (19 Fahrenheit). As long as I'm wrapped up, I love it as it's a very dry cold and everything is white - like a true winter wonderland! A lot of Northern Europe is now blanketed in snow, so we're all hoping for a white Christmas! Do you have snow where you are too? In Finland, Hanna and her husband Tomas, and children Frans, Hilda and Eedvin are cosying up in their charming rustic cottage in rural Finland. 

You'll likely recognise their home as I featured it last year - and it's so unique and memorable! This morning I popped over to Hanna's instagram as I was intrigued to see how the family have decorated their home for Christmas - and of course, it looks as cosy as can be! Here are a few pictures showing touches of red, a rustic tree, homemade paper flowers and sofas draped in sheepskin. A perfect place to curl up and spend 'Joulo' (Christmas).

Hanna loves making paper snow angels and flowers to hang on the tree and in the window. 

Find DIY tutorials for how to make Christmas snow angels here and paper flowers and stars here

I love the rustic tree, it's so pretty, don't you think? Did you see my Scandinavian Christmas tree round-up on Friday? There are some lovely rustic ones in there too! 


How lovely! I can just imagine coming in from the snow and cosying up there with the fires roaring, how about you? 

See more of Hanna's Finnish home here

If you like to make things at Christmas and are on the look out for more DIY ideas this week, here are some my favourites: 


Have a great start to the week, stay toasty! 

Niki

Photography: Hanna / @punainen.pihlaja shared with kind permission

Twitter FaceBook

Pin It
10

Subscribe To My Scandinavian Home

Subscribe to My Scandinavian Home

skovby ad


site by ANAAR

This website uses cookies to ensure you get the best experience on our website.
MORE INFO