I Found The Perfect Table and Chairs For Our Tiny cabin!


Paid partnership with  Skovby, all words and photos are my own and I only ever work with brands I love

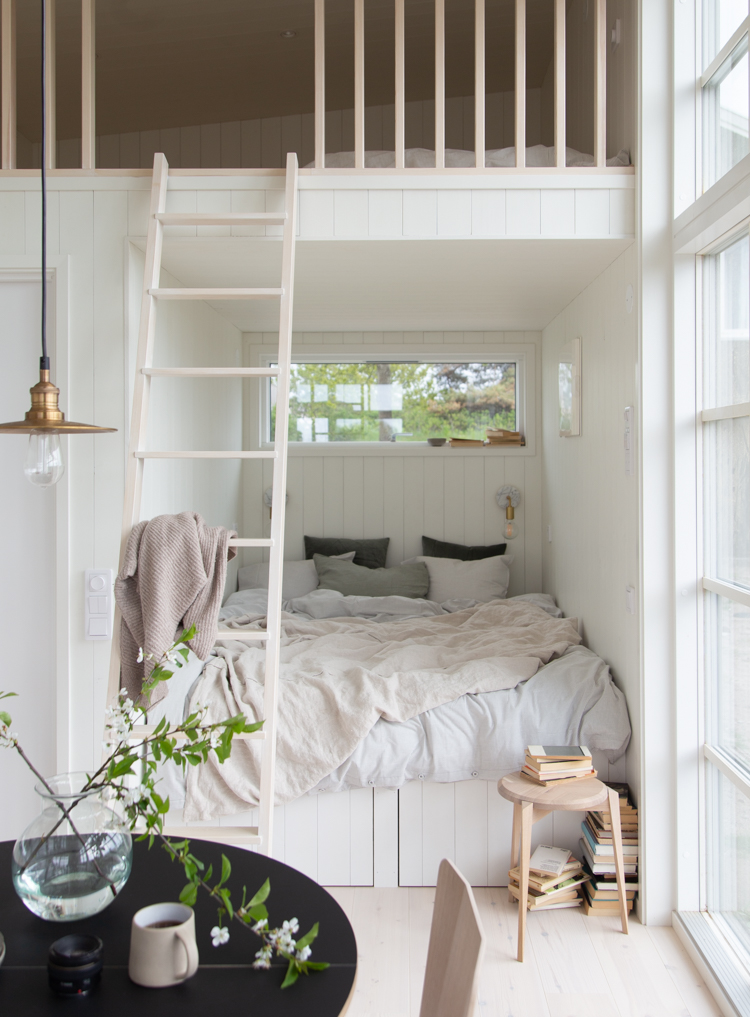
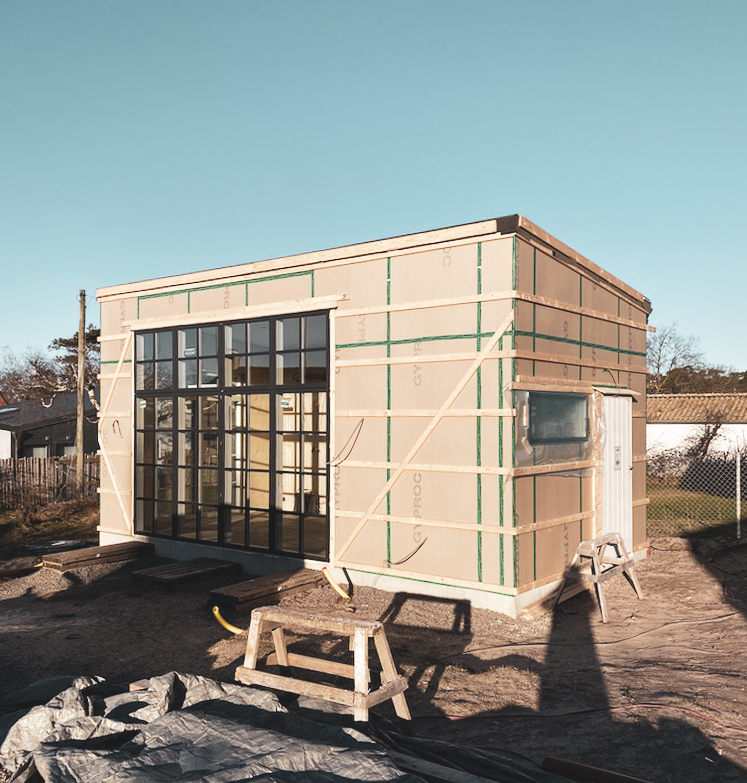
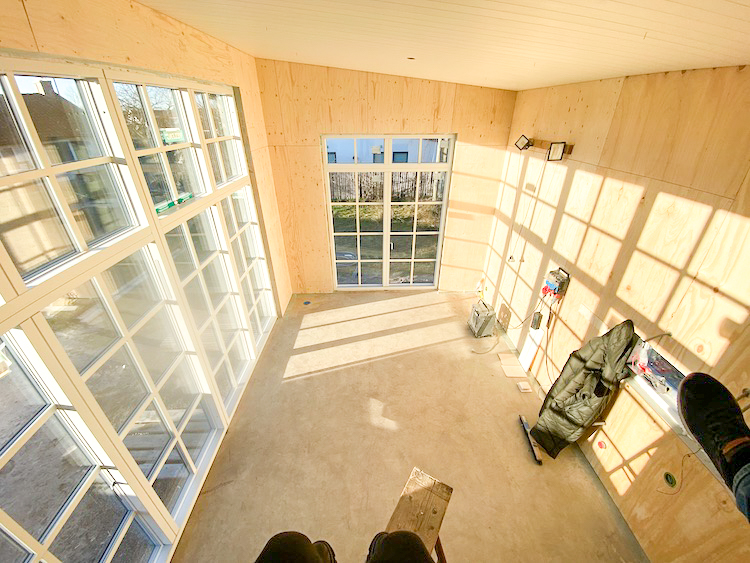
Tjena! I hope you had a great weekend! We spent some time up at our little cabin and I'm really excited to share some snapshots of our new dining area with you. I can't begin to describe the feeling when we all sat down for our first family meal there (take-away pizza, so glam!).  

When it comes to furnishing a small space (30 m2 / 322 ft sq.) I've quickly learned that choosing less and choosing right is key, otherwise the space can quickly become cluttered.

These were the criteria I had in mind for our dining area:
1. The table needed to be small but still easily seat four
2. The table should be round to save space and avoid knocking into the corners
3. The table needed to be extendable for extra guests 
4. There should be extra seating which could be stacked to one side 


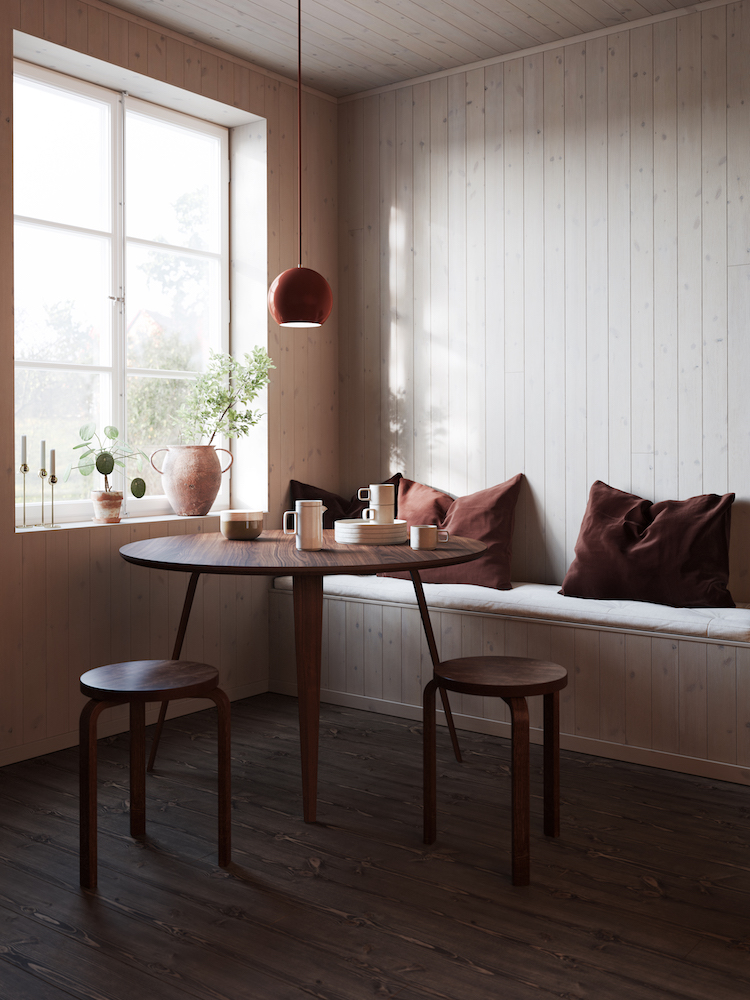
Danish brand Skovby has been a My Scandinavian Home partner for many years now - and I've always appreciated the high quality craftsmanship of their Denmark-made furniture (you might recall the glass cabinet, Per's deskthe coffee tables as well as countless other pieces). This little gem of a #120 dining table with white oil oak legs and a black laminate surface was the first to spring to mind for our cabin! 


The round table is a compact 102 cm in diameter and extendable with up to two leaves (available to buy separately), which means you can comfortably seat 6 or 8 people depending on how many leaves you add. Perfect! 

Chair wise, I chose the #807 dining chair in oak white oil. You know me, I love wood, it has such a warm feel, and the shell shape has some flex which makes it comfy. But if you want to go all out on the comfort, this model is available with upholstery for a soft touch, and the #802 version also comes with armrests.

I also picked up some #840 stools (in oak white oil) which can be stacked to the side when not in use (we've also already used them as a bedside table, sofa side table and a footrest!).  

I love that its sustainably made from leftover production wood (I first spotted it during my visit to the Danish Skovby carpenter workshop earlier this spring and picked one up there and then!). 


I hope you like the table and chairs as much as we do! In case you're interested in any of these pieces for your own small space, Skovby is available almost worldwide (find your nearest stockist here).

Incidentally, the table is available in 9 different finishes including oak white oil and white laminate tops - you can see all the variations here

In case you're wondering about the ladder, it can be removed and placed elsewhere when needed - but I guess someone could perch there too!

Give me a shout if you have any questions about anything in these pictures -I'd be happy to help! If you'd like to add any small space tips and tricks of your own, I'm all ears as the cabin is far from finished! 

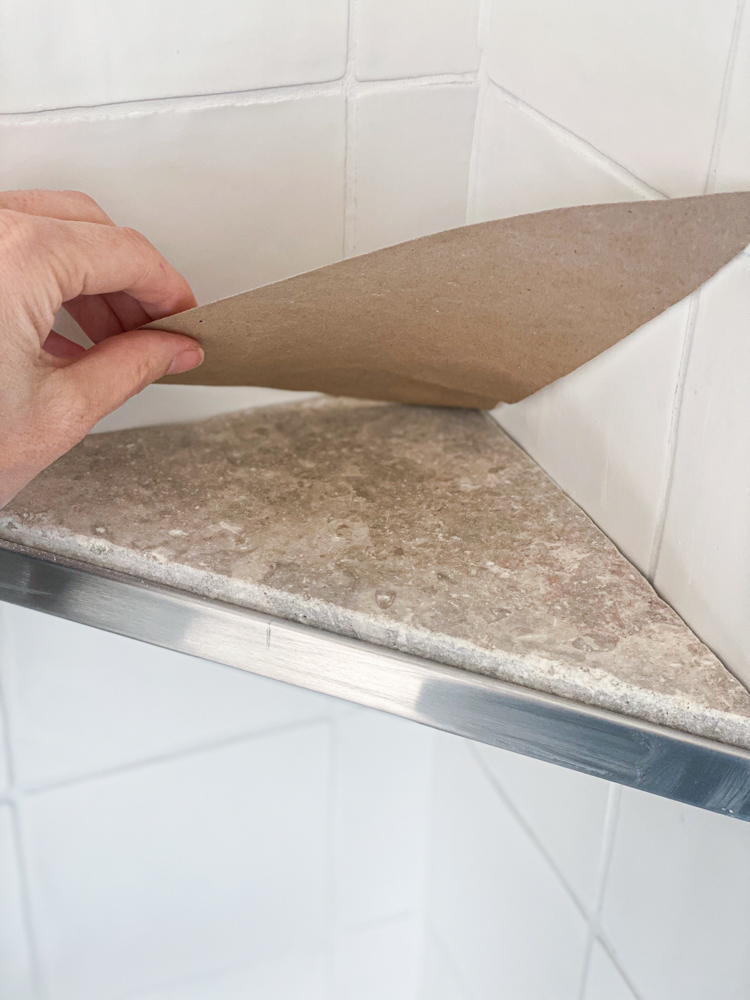
I hope to be able to share a post about our kitchen - including all the details - soon (look closely and you'll see the knobs are missing). Watch this space! 

Wishing you all a great start to the week! 

Niki 

Photography: Niki Brantmark / My Scandinavian Home

Twitter FaceBook

Pin It
13

Tiny Cabin Update: Panelling, Wood floors & Our Cosy Bed Nook


Disclosure: Norrlands Trä have kindly agreed to collaborate with us on this project

Things are taking shape in our little cabin at a rapid pace, so I felt it was time for an update!

Here's the lowdown and a few snapshots - plus I'm looking for some advice on the mattress situation further down the post (looking at you van owners!), please feel free to share your tips in the comment section and ask any questions!

Wall and ceiling panels

As you know, we were adamant about having panelling as we felt it would be a great way to create a relaxed coastal cabin feel. Are you a fan too? 

Having researched the various different styles of panelling - from contemporary to traditional we settled on the more modern Borstad Slätspont in white S0502-Y from Swedish brand Norrlands Trä

The wall and ceiling panelling gave the cabin an instant lift and feels contemporary yet coastal, smart yet relaxed - I love it when a plan comes together! 

Wood floor
The day I took the above picture it was freezing outside, and I couldn't help thinking how 'cold' the cabin felt with the concrete foundation. So, I quickly got to work on finding a wood floor.

We decided on the primed parquet pine floor in ultra protect white, also from Norrlands Trä. Light pine is a classic choice for Swedish summer cottages as it has a pared back, understated feel yet still has that wonderful softness and warmth. 

Side note: Pine is soft, which means it can be dented / marked quite easily. If you do go for this type of flooring, it's something you ned to bear in mind. We figured that wood is a living, breathing material which changes with time, and we'd embrace any marks the family make! Having said that, we'll be laying rugs in 'high flow' spots such as the kitchen, living room and dining area to protect the floor and add that all important hygge! 

After: 


I love that you can clearly see the grain and knots in the wood, it really helps to draw nature indoors and adds texture and depth to the space. 


The bed nook
In our plans, we included a nook for a 160 cm bed (with more space bunks in the loft). Since the cabin is small (30 m2 / 322 sq ft) it would also need to double up as storage without compromising on aesthetics (you know me!). Below is how the space looked during the build (while being surveyed by Per!):


This is how it looked once the panelling, floor and railings went in:

And finally, The bed nook
I did a ton of research into 160 cm beds with front storage but couldn't find anything! So, in the end we designed a wall-mounted bed platform with central legs and two VERY long pull-out drawers on wheels (see below). Leftover panels were used for the fronts for a seamless look. 

And we finally had a bed! 

Sidenote: we're working on the air circulation -most likely, we'll drill holes in the base and also add a special air circulator layer under the mattress (without this, bacteria can build up and a mattress can quickly become mouldy underneath). This still a work in progress though, so tips are very welcome! 

In the meantime, we're so looking forward to sleeping and hanging out right here. So excited!

I hope you enjoyed this update! Please do give me a shout below if you have any questions. 

I'm so looking forward to sharing other areas of the cabin with you soon. 

Wishing you a trevlig helg! (lovely weekend!), 

Niki 

Twitter FaceBook

Pin It
36

Tiny Cabin Bathroom Sneak Peek - Plus a Few Questions!

*GSI Ceramica and Cristina Rubinetterie are kindly partnering in our project. 

I can't tell you how much progress we've made in the bathroom at the cabin* since I shared the original plans. After a copious amount of work (who knew a 3.6 m2 (38f2) bathroom could take up so much time?), it's finally coming together! In fact, it's almost finished, woohoooo! Here are some snapshots of the progress which I snapped with my phone. Oh, and I'd love to hear your thoughts on some of the final details too. 

It's been fun to see the space come together - one layer at a time, starting from the bare bones. 

Wall tiles
For the shower and lower section of the wall we chose matt white square tiles with a simple white grouting (I felt this would give a cleaner, less fussy look in such a small space). 

Wall mounted loo and taps
I love a wall hung loo (specifically the WC Kube X from GSI Ceramica) they look so sleek and also help to contribute to an airier feel in a small space. I was also keen to install wall mounted taps (I selected the Basin Mixer CRITV257 from series Tricolore Verde by CRISTINA Rubinetterie)However, in order to achieve this we needed to build out a section of the wall by 15 cm (wide enough to fit a Gerberit cistern). I was a little nervous as it's already a narrow bathroom - but actually, I'm thrilled with the result. The shelf has turned out to be a real bonus!  

Bathroom paint colour
For the ceiling and walls (without tiles) I went for Kalk from the Jotun Lady Aqua bathroom range. It's a lovely, soft, warm tone which compliments the matt white sink and loo as well as the stone floor. 

Wall mounted sink and cabinet
Here's a close up of the sleek, timeless Kube X washbasin (60 x 47) in matt white. I'm so happy with it as well as the Prisma Unit cabinet (also from GSI Ceramica) - it's perfect for storage, and since the entire unit is mounted, it gives the illusion of space. 

Taps and shower
Above and below you can see a close up of the basin Mixer CRITV257 and External Thermostatic shower mixer with overhead and hand shower CRITV486 from CRISTINA Rubinetterie. The 'brushed old brass' finish has a beautiful patina and adds so much texture. 

Shower door
We still need to add a glass wall (80 cm wide) between the shower and sink. However, I haven't decided if we also need a shower door (70 cm wide) across the front, what do you think? 

Floor tiles and details
And finally - the stone floor. I sourced the Tumbled Turtle tiles from Swedish brand Stiltje (I love the owner Pamela; she has incredible taste!). We really splurged on these and once the floor had been laid, there were a few tiles leftover which we used for the ledge above the sink and a corner shelf in the shower.  

I hope you like what we've done so far! I'm so excited the bathroom is nearly finished. We're on the home straight! 
 
The next step is to add:

1. A shower wall and potentially a shower door 
2. A privacy film inside the garden glass door (or should we go for a blind?) 
3. A loo roll holder - any thoughts on where this should go? 
4. Hooks for towels, robes, swimwear etc. 
5. All our toiletries! 

I'd love to hear your two pennies worth! 

Hopefully it will all be finished in the next few weeks - I'm so looking forward to sharing the final reveal once everything is in place!

Niki

All photos taken with my iPhone. 

*For those of you who are new to My Scandinavian Home - Per and I are building a 30 m2 (323 f2) cabin in the garden of my Mother-in-law's summer cottage on Sweden's West coast. You can see the plans here

Twitter FaceBook

Pin It
25

Choosing a Wood Floor For our Tiny Cabin, From Light to Dark

Disclosure: Norrlands Trä have kindly agreed to collaborate with us on this project

Hejsan! A cabin update is long overdue! We're still nutting out the interior details and lately we've been focused on the floor. Living in Scandinavia, it was a no brainer to go for a wood floor - I love the warmth, the softness underfoot and how it ages over time. We were specifically looking for a wood floor with a simple and traditional look and that comes from a sustainable source. We headed to Norrlands Trä - the Swedish company from whom we got our wall panelling (and only use FSC certifiable wood from the forests of North Sweden) to pick up some samples from dark to light. Here are some of the variations we considered - and the wood floor we eventually chose.

Blond tones
Nothing says Scandinavian like 'blond' wood, don't you think? The light touch is great for brightening up a space, while still adding warmth. But there can be massive variations in light wood - from almost white to dark blond (it's starting to sound like a trip to the hairdressers!), and don't get me started on the subtle nuances: from cold to warm tones, and how the colour changes over time. It's a minefield! 

Lightest shade
Save from painting the floor white, the brushed pine (Borstat Furugolv) in 'ultra protect white' is the lightest in the Norrlands Trä range. It's close to white and has a wonderful, ridged patina with the grain showing through. Pine can be incredibly soft, and so I like that the surface has been gently teased away with a brush, making it a more durable choice. 

Light pine
We were also drawn to the pine floor (Putsat furugolv) in ultra protect white which has been primed and then sandpapered giving a soft, smooth result (a treat for the feet!). We love that it has a traditional and rustic feel which is so synonymous with the Swedish summer cottage. One thing to be mindful of - the softer finish does require some extra work over the years to maintain it. However, it is made from solid wood so you can sand it down as often as you like - or leave it as it is and appreciate the patina as it ages.  I'm guessing we'd do the latter!

Darker wood floor tones
You might have noticed that darker wood floors have been making a comeback lately. The deep hue is great for adding contrast, grounding a space and creating a cosy ambience. 

Grey finish
This brushed pine floor (Borstat Furugolv) has a lovely rustic feel - and we liked the stone grey finish. Given all the windows in our cabin we could definitely get away with a darker floor like this one too. 

Dark finish
And finally, we looked at going completely over to the dark side with a brushed pine floor ((Borstat Furugolv) in ultra protect brown. The rich tone gives a wonderful atmospheric feel and adds a whole level of cosiness. It's perfect for creating that dark cabin feel. 


A note on wood ageing over time
Wood is a natural substance that darkens over time - especially when exposed to lots of light. Some wood gets more of a grey tint, whereas others can appear more yellow. Check with your wood floor supplier before purchasing to find out about each individual wood floor. Also, be mindful that rugs block the sunlight which can leave permanent marks on your wood floor. If the room gets a lot of light, think about removing them periodically.  

Our choice of floor
Edited: originally I wrote that we went for the primed pine floor in ultra protect white but this was an error - we actually chose the primed parquet pine floor in ultra protect white. This has an extremely similar look and feel, but the parquet is a more practical choice for us since it simply clicks into place making it easier to install, where as the solid wood needs to be nailed into place. Also, it's thinner which works better with the lower ceiling height in the loft. Overall, it has a lovely summery feel and during the winter it will help to brighten up the darkness! 


We tested the sample up at the cabin. 

Welcome inside my humble home! 

The panelling on the walls and ceiling is now in place and looks so beautiful! And the wood floor is a perfect fit! 

Below is the simple material and colour mood board we have decided to work with. The stone and white tile will be installed in the bathroom and the dark sand is for the kitchen cabinets. It feels like it reflects the surrounding coast and forest in a beautiful way - what do you think?  


It feels like things are really starting to happen now and it's the cabin is moving from an empty shell into a home! Exciting! 

What type of floor do you have in your home? Do you have a favourite out of these different looks? or perhaps you have gone for tiles, like my sister who has a dog. I'd love to hear your thoughts in the comment section below! 

Niki

Credits: 1. Lifestyle photo courtesy of Norrlands Trä, styled by Lotta Agaton. 2 - 6 Lifestyle photos courtesy of Norrlands Trä. 7+ photos snapped with my iPhone by Per and myself this weekend! 

Twitter FaceBook

Pin It
8

Cabin Update: Wood Burning Stove (Plus Try the Tool!)

Disclosure: Contura have kindly agreed to partner on our cabin project

Over the Christmas holidays, so much more happened than playing about in the snow and drinking glögg: our little cabin sprang to life (see the design plans here)! I'd love to say that the picture above is of the interior - but we're far from finished! The good news is though, the structure is in place:


So exciting! With all the bigger aspects decided including the wood panelling, windows and doors and the bathroom, it's time to decide on a wood burning stove. I LOVE a fireplace, do you? To me, they are pure hygge and I couldn't imagine our little cabin without one! 

Which one?
I knew I wanted to get one from Contura. The Swedish brand is located only an hour from the cabin and recognised as the leading manufacturer of woodburning stoves in Scandinavia as well as a big player across Europe (AKA the guys delivering the hygge!). I've heard many a great things about their Swedish-made log burners when it comes to quality and efficiency, and I love the design!  


Choosing a stove using the virtual tool
Anyone who's been in the market for a wood burning stove will know there are so many out there to choose from, it's almost overwhelming! Keep a look out for a stove that works for the size and design of space you have. Plus, I found the Contura 'build your stove' tool super handy! It allows you to build your own stove and then virtually place it in your home to see how it looks! Hours of fun! 

Admittedly, I got a bit carried away and Per was very nervous when I revealed pictures of how one might look in our bedroom, sitting room and bathroom at home! 

To use it, just head over to Contura and click on ' build your stove' (top right orange button) and follow the simple step by step instructions. 


In the end I decided on the Wood burning stove Contura 810 in black steel with built-in wood storage for our cabin, which I think is super sleek and great for space-saving. 


Positioning

Above is a snapshot from inside our cabin right now (taken from the loft bed ). We plan to place the wood burning stove in the far left corner. This is how it will look - except a little larger in size and with a chimney:

I think it's going to be great and feeling so excited now. Here's to cosy days at the cabin! 

Just need the panelling to go in and get the bathroom and kitchen fitted, the floors laid..... gaaah so much to do! 

Do you have a fireplace in your home? Or perhaps you've been considering one (try the tool if so!)? Please do share your experiences below! 

Wishing you all a hyggeligt weekend!

Niki

Twitter FaceBook

Pin It
5

Our Small Bathroom Plans / Design For the Cabin


GSI Ceramica and Cristina Rubinetterie are kindly partnering in our project. 

I was up at the cabin yesterday (see our plans) and the build is progressing nicely! I can't tell you how excited I am! Buoyed by the progress, I thought it was time to share an update on the next phase of our build: the bathroom! 

Floorplan 


With only 3.66 metres square (XX f2) to play with, it's a case of dream big, think small! Even so, we had several criteria for the bathroom: it should be low maintenance, long-lasting, practical and of course beautiful! Let's start with my favourite - the latter! 

Inspiration:

Natural & Raw
Since being up at the cottage is all about enjoying nature, I am keen to keep the look natural. I love the idea of rough finishes and a fairly minimalist approach - with a warm, earthy palette. 


The Design
With the little space we have, I knew a bath would be out of the question (I guess we have the sea nearby!) - so we focused on a WC, sink and shower. 

I've worked with the incredible Italian brand GSI Ceramica for several years now and appreciate how the company prides itself on combining the latest technology with craftsmanship, rooted in a thousand-year-old tradition of Civita Castellana ceramic district.  I always appreciate the high quality which is vital since we're keen for our little cabin to be as low maintenance and long-lasting as possible  - something I've learnt from my Scandinavian friends!

The GSI Ceramica design team came back with these drawings which were spot on: 


The matt white loo and sink are from the Kube X Collection which you mind recognise from this feature. I love the rectangle forms, slender edges and pared down lines. It's a collection that offers something for every size bathroom too, so I knew it would be perfect for our small space! 


1. WC: Kube X 941509: This wall-hung loo is seriously awesome: it features Swirlflush (the quietest flushing system in the world!), helps to save water and has a soft close seat - all important when you live in close quarters, don't you think?

2. Kube X washbasin - 60 x 47: A sleek, narrow washbasin which is perfect for small spaces (loving the white plug!).

3. Prisma Unit 60 x 47: A cabinet was essential - especially with a tween and teenage girl knocking about! This unit launches in 2022 and has been specially designed to fit the Kube X Collection. I opted for a 'Bianco' matt Finnish. Here's a sneak peek of what to expect from the collection: 


4. Four Season Mirror with LED - 60 cm: yes, we'll spend most of our days up there with salty hair and make-up free, but you know, we don't want to scare guests, and this mirror comes with a built in LED light  (always wanted that!). 

Taps & shower
For the taps and shower, we chose items from Cristina Rubinetterie. You'll likely recognise the name since the Italian brand is available in over 60 countries and they've been producing beautiful pieces for the bathroom, kitchen and wellness interiors since 1949! I was looking for something simple and elegant, yet practical with a beautiful finish, and the Tricolore Verde collection fits the bill perfectly!  


*Both in a beautiful matt, brushed old brass finish. 

A note on wall hung loos and taps:
We learned you have to allow for up to 20cm wall space to create room for the cistern and tap fittings. We were slightly concerned that this would eat into the already small space, but came to the conclusion that it would create a perfect opportunity for a built-in shelf above the loo and sink.

Tiles:

And finally, the tiles! I was considering wood panelling (as you can see from the original design) but after some deliberation, I decided to go for more practical, square hand cut tiles in white from a local Swedish tile manufacturer. And for the floor - beautiful Tumbled Turtle tiles from Stiltje. Both very raw with a matt finish -of course!

Thank you for bearing with me through a very long post - I hope this info is helpful for anyone planning a new bathroom in 2022!  

Now, it's just to build it (gaaah!). In the meantime, here's a snapshot of how the bathroom looks right now: 


There's work to be done! 

Niki

Photo credits: 1. Villa Hagerman - M Arkitektur 2. Hotel Santa Clara 3. Coco & Jack 4. Mathew Williams for Remodelista 5. Bert & May 6. Sequence by GSI ceramica 7. Cristina Rubinetterie

Twitter FaceBook

Pin It
2

Subscribe To My Scandinavian Home

Subscribe to My Scandinavian Home

skovby ad


site by ANAAR

This website uses cookies to ensure you get the best experience on our website.
MORE INFO