Scrolling

Tiny Cabin Update: Panelling, Wood floors & Our Cosy Bed Nook


Disclosure: Norrlands Trä have kindly agreed to collaborate with us on this project

Things are taking shape in our little cabin at a rapid pace, so I felt it was time for an update!

Here's the lowdown and a few snapshots - plus I'm looking for some advice on the mattress situation further down the post (looking at you van owners!), please feel free to share your tips in the comment section and ask any questions!

Wall and ceiling panels

As you know, we were adamant about having panelling as we felt it would be a great way to create a relaxed coastal cabin feel. Are you a fan too? 

Having researched the various different styles of panelling - from contemporary to traditional we settled on the more modern Borstad Slätspont in white S0502-Y from Swedish brand Norrlands Trä

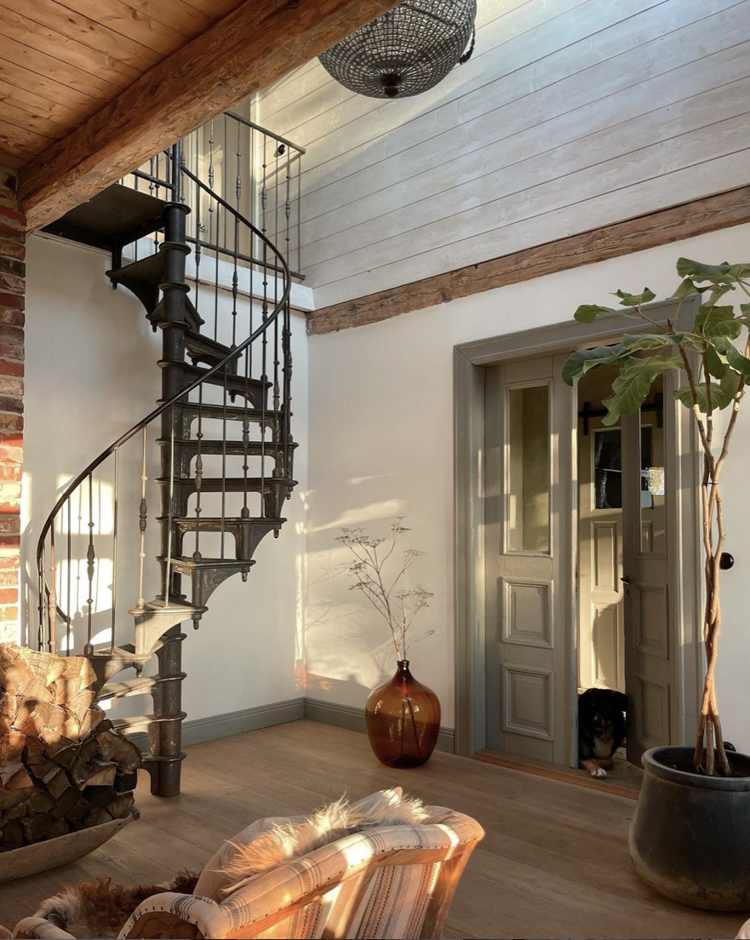
The wall and ceiling panelling gave the cabin an instant lift and feels contemporary yet coastal, smart yet relaxed - I love it when a plan comes together! 
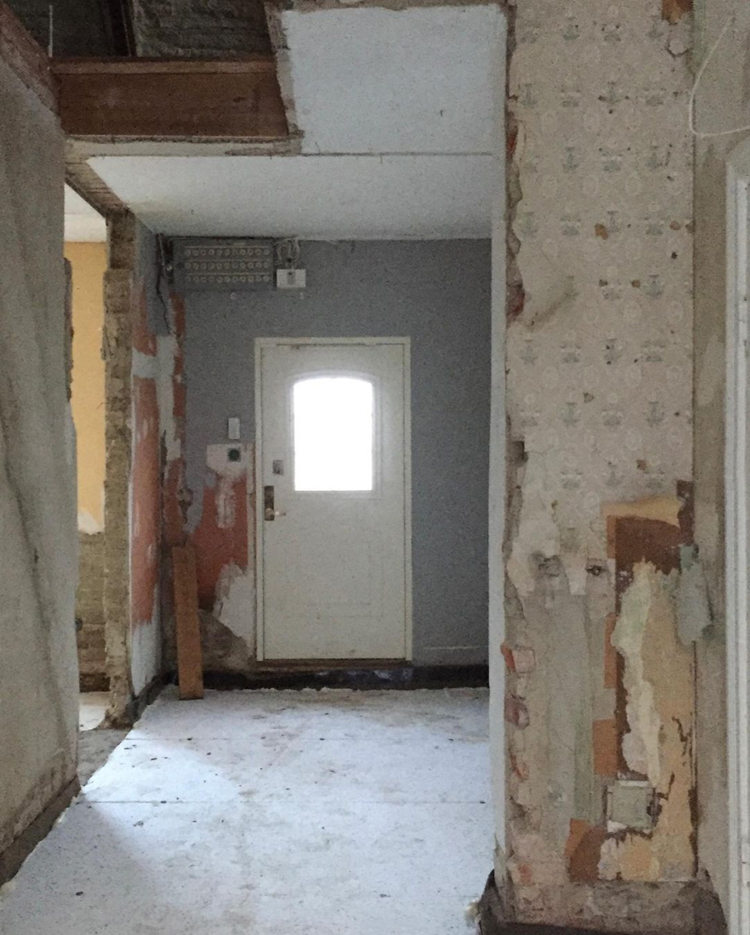
Wood floor
The day I took the above picture it was freezing outside, and I couldn't help thinking how 'cold' the cabin felt with the concrete foundation. So, I quickly got to work on finding a wood floor.

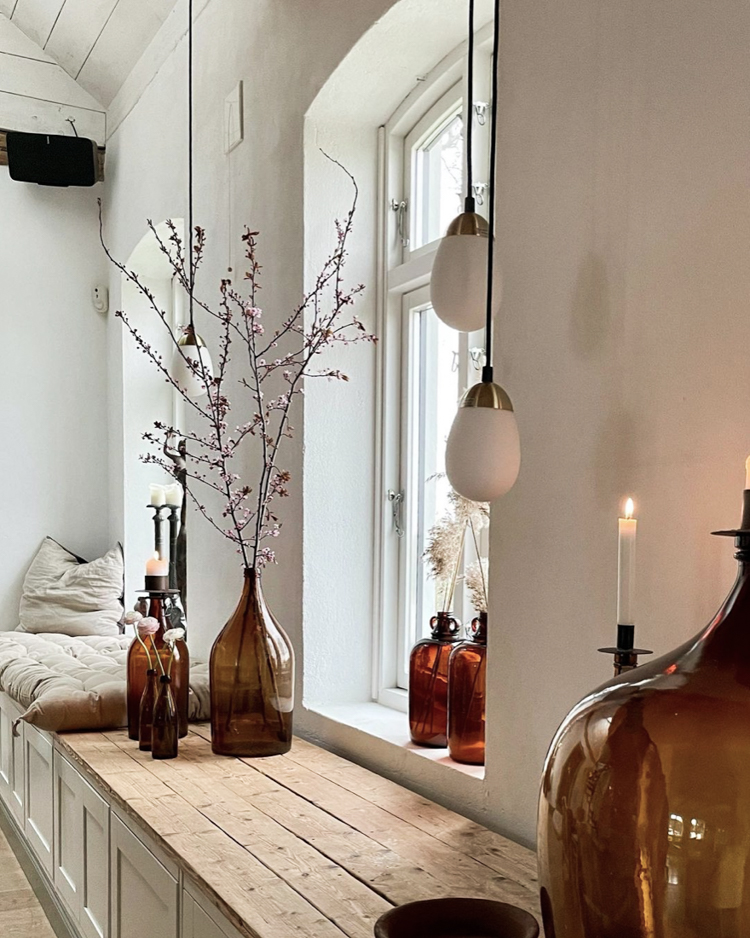
We decided on the primed parquet pine floor in ultra protect white, also from Norrlands Trä. Light pine is a classic choice for Swedish summer cottages as it has a pared back, understated feel yet still has that wonderful softness and warmth. 

Side note: Pine is soft, which means it can be dented / marked quite easily. If you do go for this type of flooring, it's something you ned to bear in mind. We figured that wood is a living, breathing material which changes with time, and we'd embrace any marks the family make! Having said that, we'll be laying rugs in 'high flow' spots such as the kitchen, living room and dining area to protect the floor and add that all important hygge! 

After: 


I love that you can clearly see the grain and knots in the wood, it really helps to draw nature indoors and adds texture and depth to the space. 
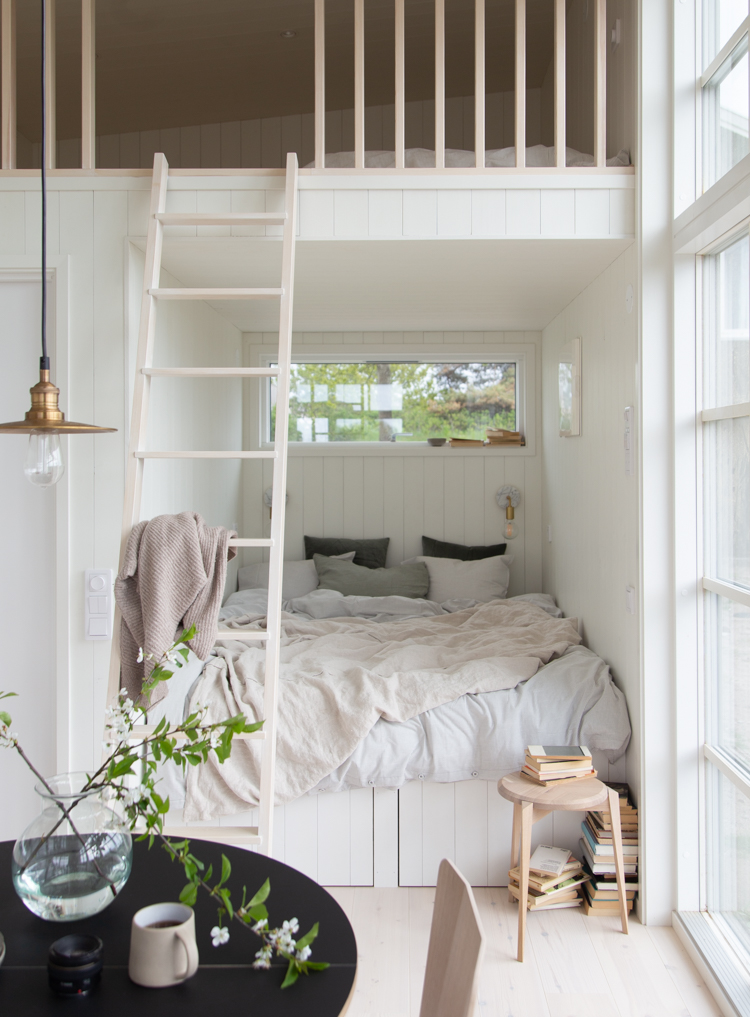

The bed nook
In our plans, we included a nook for a 160 cm bed (with more space bunks in the loft). Since the cabin is small (30 m2 / 322 sq ft) it would also need to double up as storage without compromising on aesthetics (you know me!). Below is how the space looked during the build (while being surveyed by Per!):


This is how it looked once the panelling, floor and railings went in:

And finally, The bed nook
I did a ton of research into 160 cm beds with front storage but couldn't find anything! So, in the end we designed a wall-mounted bed platform with central legs and two VERY long pull-out drawers on wheels (see below). Leftover panels were used for the fronts for a seamless look. 

And we finally had a bed! 

Sidenote: we're working on the air circulation -most likely, we'll drill holes in the base and also add a special air circulator layer under the mattress (without this, bacteria can build up and a mattress can quickly become mouldy underneath). This still a work in progress though, so tips are very welcome! 

In the meantime, we're so looking forward to sleeping and hanging out right here. So excited!

I hope you enjoyed this update! Please do give me a shout below if you have any questions. 

I'm so looking forward to sharing other areas of the cabin with you soon. 

Wishing you a trevlig helg! (lovely weekend!), 

Niki 

Twitter FaceBook

Pin It
36

Makeover: Creating My Dream Wardrobe From Start to Finish!


Paid partnership with Elfa, all words are my own and I only ever work with brands I love. 

Remember I said this was going to the year I finally organise my home? I've moved one step closer - my new wardrobe is finished! 

Allow me to paint the scene. My previous wardrobe was sandwiched between the girls' bedrooms on the floor below, it was really small and cramped and I had to tip-toe through their rooms at night. I could never find anything; it simply wasn't practical in any shape or form and honestly, a total mess!

The far side of our bedroom on the top floor seemed like the obvious choice for a new one. In the past, this corner a reading corner, yoga studio and even once graced the cover of a book as my home office! But I've never really felt it's been put to great use - until now! 

The problem was, it's a slightly awkward spot: sandwiched between the stairs and a large radiator - plus it has a sloped ceiling. 

Here's how I transformed it with the help of international Swedish brand Elfa

The brief
I had an entire jumble of items that needed a home - from maxi dresses, jumpsuits, sweaters, jeans and gym kit, to hats, tights, jewellery and lingerie! Since we share a bathroom between five of us (two of which are teenagers) I was also keen to incorporate a little spot to do my hair and make-up. A girl can dream!

The obstacles


Radiator
This mighty radiator was in the way. To be honest, we hadn't used it all winter since I like to keep the area cool for my beloved lemon tree (AKA my fourth child!) while it winters indoors. Removing it was a no-brainer, so we called the plumber in. It left a gaping hole which we plugged and painted over.  

Bannisters
The bannisters to the left of the space were also an obstacle. In the end we decided to build a short floor-to-ceiling wall to frame the side of the wardrobe. 

Angled ceiling
Probably one of the most common problems when building a wardrobe is an awkward sloped ceiling. We hired a builder to insert a made-to-measure triangular shaped wood piece above the open-topped wardrobe. It was painted the same colour for a seamless look. The best thing about this is that we can use the full height of the room for storage. 

The design
The beauty of Elfa is that the system is fully flexible and can be adapted to fit your space and your needs. Plus, they offer a great online planning tool which enables you to easily design and plan your wardrobe to the exact measurements of your room - love that!  

The system is centred around a series of vertical rods from which you 'click-in' your choice of shelves, sliding shoe racks, trouser rails, tie racks, rods, drawers, mirrors, hooks etc. 

Since it's in our bedroom, I wanted to go for a slightly smarter option, choosing a few items from the Décor assortment which combines function and flexibility with the style and luxury of wood. I combined open and closed solutions together with extra features such as a gliding shoe and trouser rack and somewhere to hang shorter and longer clothes. 

Door selection

I chose Forma doors in melamine satin white - a three door sliding solution. There are countless others to choose from (for those of you who live in Sweden, Norway, Denmark or Finland) - or you could go wild and opt for an open solution (I'm WAY too messy for that!).

The results

Once the vertical rods had been installed, everything else could just be clicked into place. Most of my wardrobe is made up of wire shelves with Décor fascia for a sleek, smart finish. 


I don't know how good you are at folding, but I think Marie Kondo would describe mine as distinctly sub-par! If you're the same, let me tell you, these click-in wire shelf dividers are a game changer. Not only do they condense the width of your folded sweaters making them appear more neat - they also allow you to double up on each shelf so you have room for more clothes. 


A long closet rod means I have place for longer and shorter clothes. And I placed some of my smarter sweaters in boxes from the Elfa studio - love that they can be dust free but still visible. 


I particularly love the Décor gliding pant rack and gliding shoe mesh shelf. How smart and practical are they? Only the best for my gold sparkly boots! 


Over to the opposite side of my wardrobe and guess what? 


Tadaaa! I have a special place to do my hair and make-up!


This is thanks to a click-in Décor mirror and accessory shelf for all my brushes, make-up, perfume etc. I also picked up a jewellery box from the Elfa studio in Malmö

So much more relaxing to get ready without someone else on the loo behind me (not kidding!). 


Underneath, two different sized mesh drawers with Décor drawer fronts provide storage for everything from scarves, sunglasses and purses to lingerie and nightwear. I chose the knob with leather pull.

I added a soft drawer accessories tray to the upper drawers and then simple mesh metal dividers to the lower drawers - all of which help to keep the drawers neat and organised! 


Don't mind me while I hang out around my new dream wardrobe picking out jungle-style clothes and generally admiring ow neat it is! I've got no excuses now not to use a wardrobe instead of a chair at night (gaaah!) and up my style game. Oh, the pressure! 

I hope you found this wardrobe build interesting / inspiring - especially if you are looking to organise a room in your home. If so, check out Elfa and find your nearest store here - they ship pretty much worldwide. 

Next step: Allie's bedroom. Back to the planning tool! 

I look forward to sharing the results with you in early June!

Niki

Photography: Niki Brantmark

Twitter FaceBook

Pin It
14

A Dated Property is Restored to a Dream Swedish Country House

From a summer cottage on an island in southern Jutland, Denmark yesterday - to the fields of Skåne, South Sweden today: welcome to Marie and Eric's beautiful country home. The pair have been painstakingly restoring their dream home for over four years - transforming both the interior and exterior.  To say they had vision would be an understatement. In fact, the facade alone will inspire any house hunter out there to see beyond less attractive exteriors! Step inside, and you're transported into a cosy world of exposed wood beams, arched windows, DIY cabinets and antique furniture. Ready to feel inspired? Let's take the tour. 

Exterior before

A red brick house has been given a complete make-over with the help of a new facade, windows and doors.

Exterior after

Entrance before

Entrance after

Main kitchen after the renovation


The beautiful black glass cabinet was made using a built-in structure fitted with antique pains. It reminds me of the DIY cabinet in the Montana home of Jana Roach

Main living area before 

Previously a warren of small, modern rooms, Eric and Marie completely gutted the space, knocking down walls, ripping out the floor and stripping back the ceiling to reveal the original wood beams and original architecture. 


Main living area after
The cosy open-plan living room and dining area is bathed in light from arched windows, while wood beam ceilings add warmth and an intimate feel to the spacious room. 


Mezzanine floor after

Bathroom before

The bathroom is pretty much unrecognisable, with the ceiling completely knocked through and smaller windows exchanged for arched glass doors in keeping with traditional Skåne architecture. 

Bathroom after

Quite the transformation!

I love it when a house is restored to its former glory like this, it requires so much dedication, but the results are so worth it! 

Is there anything that stood out to you? 

You can see more of Marie and Eric's wonderful home and their ongoing renovation over at @oliverogård

There are a ton more 'before and after' tours in this archive if you feel like hanging around for a while (if this pops up first, just scroll past!). 

I'm very excited about sharing my new dream wardrobe with you tomorrow including the before pictures, the design and results. I hope you're going to like it as much as I do - hopefully it might inspire anyone out there looking to create some more storage! 

Vi ses imorgon!

Niki 

Photography courtesy of @oliverogård, shared with kind permission. 

Twitter FaceBook

Pin It
10

Before and After: A Rundown Croft Becomes an Idyllic Swedish Summer Cottage

When I first visited Sweden at the tender age of nine, I completely fell in love with my Swedish friends' summer cottage. It was everything you'd associate with the Swedish summer: a picturesque red and white cottage surrounded by woodland, lakes and the sweet scent of roses. Oh, and maybe the odd mosquito! When I stumbled across Alex and Erika's country home online yesterday, it took me straight back to that summer! Affectionately known as Gubbetorp, Alex and Erika's croft is located in the beautiful Östergötland countryside and has been lovingly restored one room at a time.  The pair share a passion for  antiques, vintage finds and up cycling all of which add to the charm of the space. Here are a few snapshots from before and after the renovation - including ikea hacks, outdoor loo and all! 

Kitchen before


Kitchen after


Sitting room before 

Sitting room after

The pair peeled back the laminate floor to discover a beautiful wood floor - what a great discovery! Wallpaper from Böråstapeter adds a cosy touch to the room and helps draw nature indoors. 


The hall before 


Hall after 
Alex and Erika picked up an IKEA chest of drawers for a song (100 SEK - or 8 quid!) and painted it in a soft grey-green. Rabarber 1792 wallpaper adds a vibrant feel to the space. 


Outdoor loo before

It's not that uncommon for Swedish cottages to have an outdoor loo with no running water. I recently stayed at Helen's lovely place which was the same! It took me back to the days I spent Grandmother's house. Granny Ruth had an outdoor and indoor loo. We never used the outdoor one as it was always full of spiders! 

But the ones I've experienced in Sweden are so much fresher - especially after a make-over! 

Outdoor loo 

Erika and Alex have completely spruced up their outdoor loo - adding wood panelling which has been painted in the same hue as the cottage interior. 

They've also added home comforts such as a hand towel, magazines, fresh wildflowers and perhaps most importantly - a vintage water tank for washing hands. 

The standout piece though, has to be the magnificent antique dresser - it adds such a homely touch! 

What a difference! 

Their garden is simply magical - especially in summertime. It has me dreaming of midsummer (which is only 8 weeks away!) and long summer days alfresco! 

I hope you enjoyed this before and after feature as much as I have! 

If you'd like to see more snapshots from Alex and Erika's home head on over to @gubbetorp.

You might also like to feel inspired by other idyllic Swedish summer cottages here: 


And of course, before and afters

Here's to a sunny, carefree weekend ahead! 

See you Monday friends! 

Niki

Photography: @gubbetorp shared with kind permission

Twitter FaceBook

Pin It
8

Subscribe To My Scandinavian Home

Subscribe to My Scandinavian Home

skovby ad


site by ANAAR

This website uses cookies to ensure you get the best experience on our website.
MORE INFO